


Best Sellers
Traditional divides between personal and professional space.

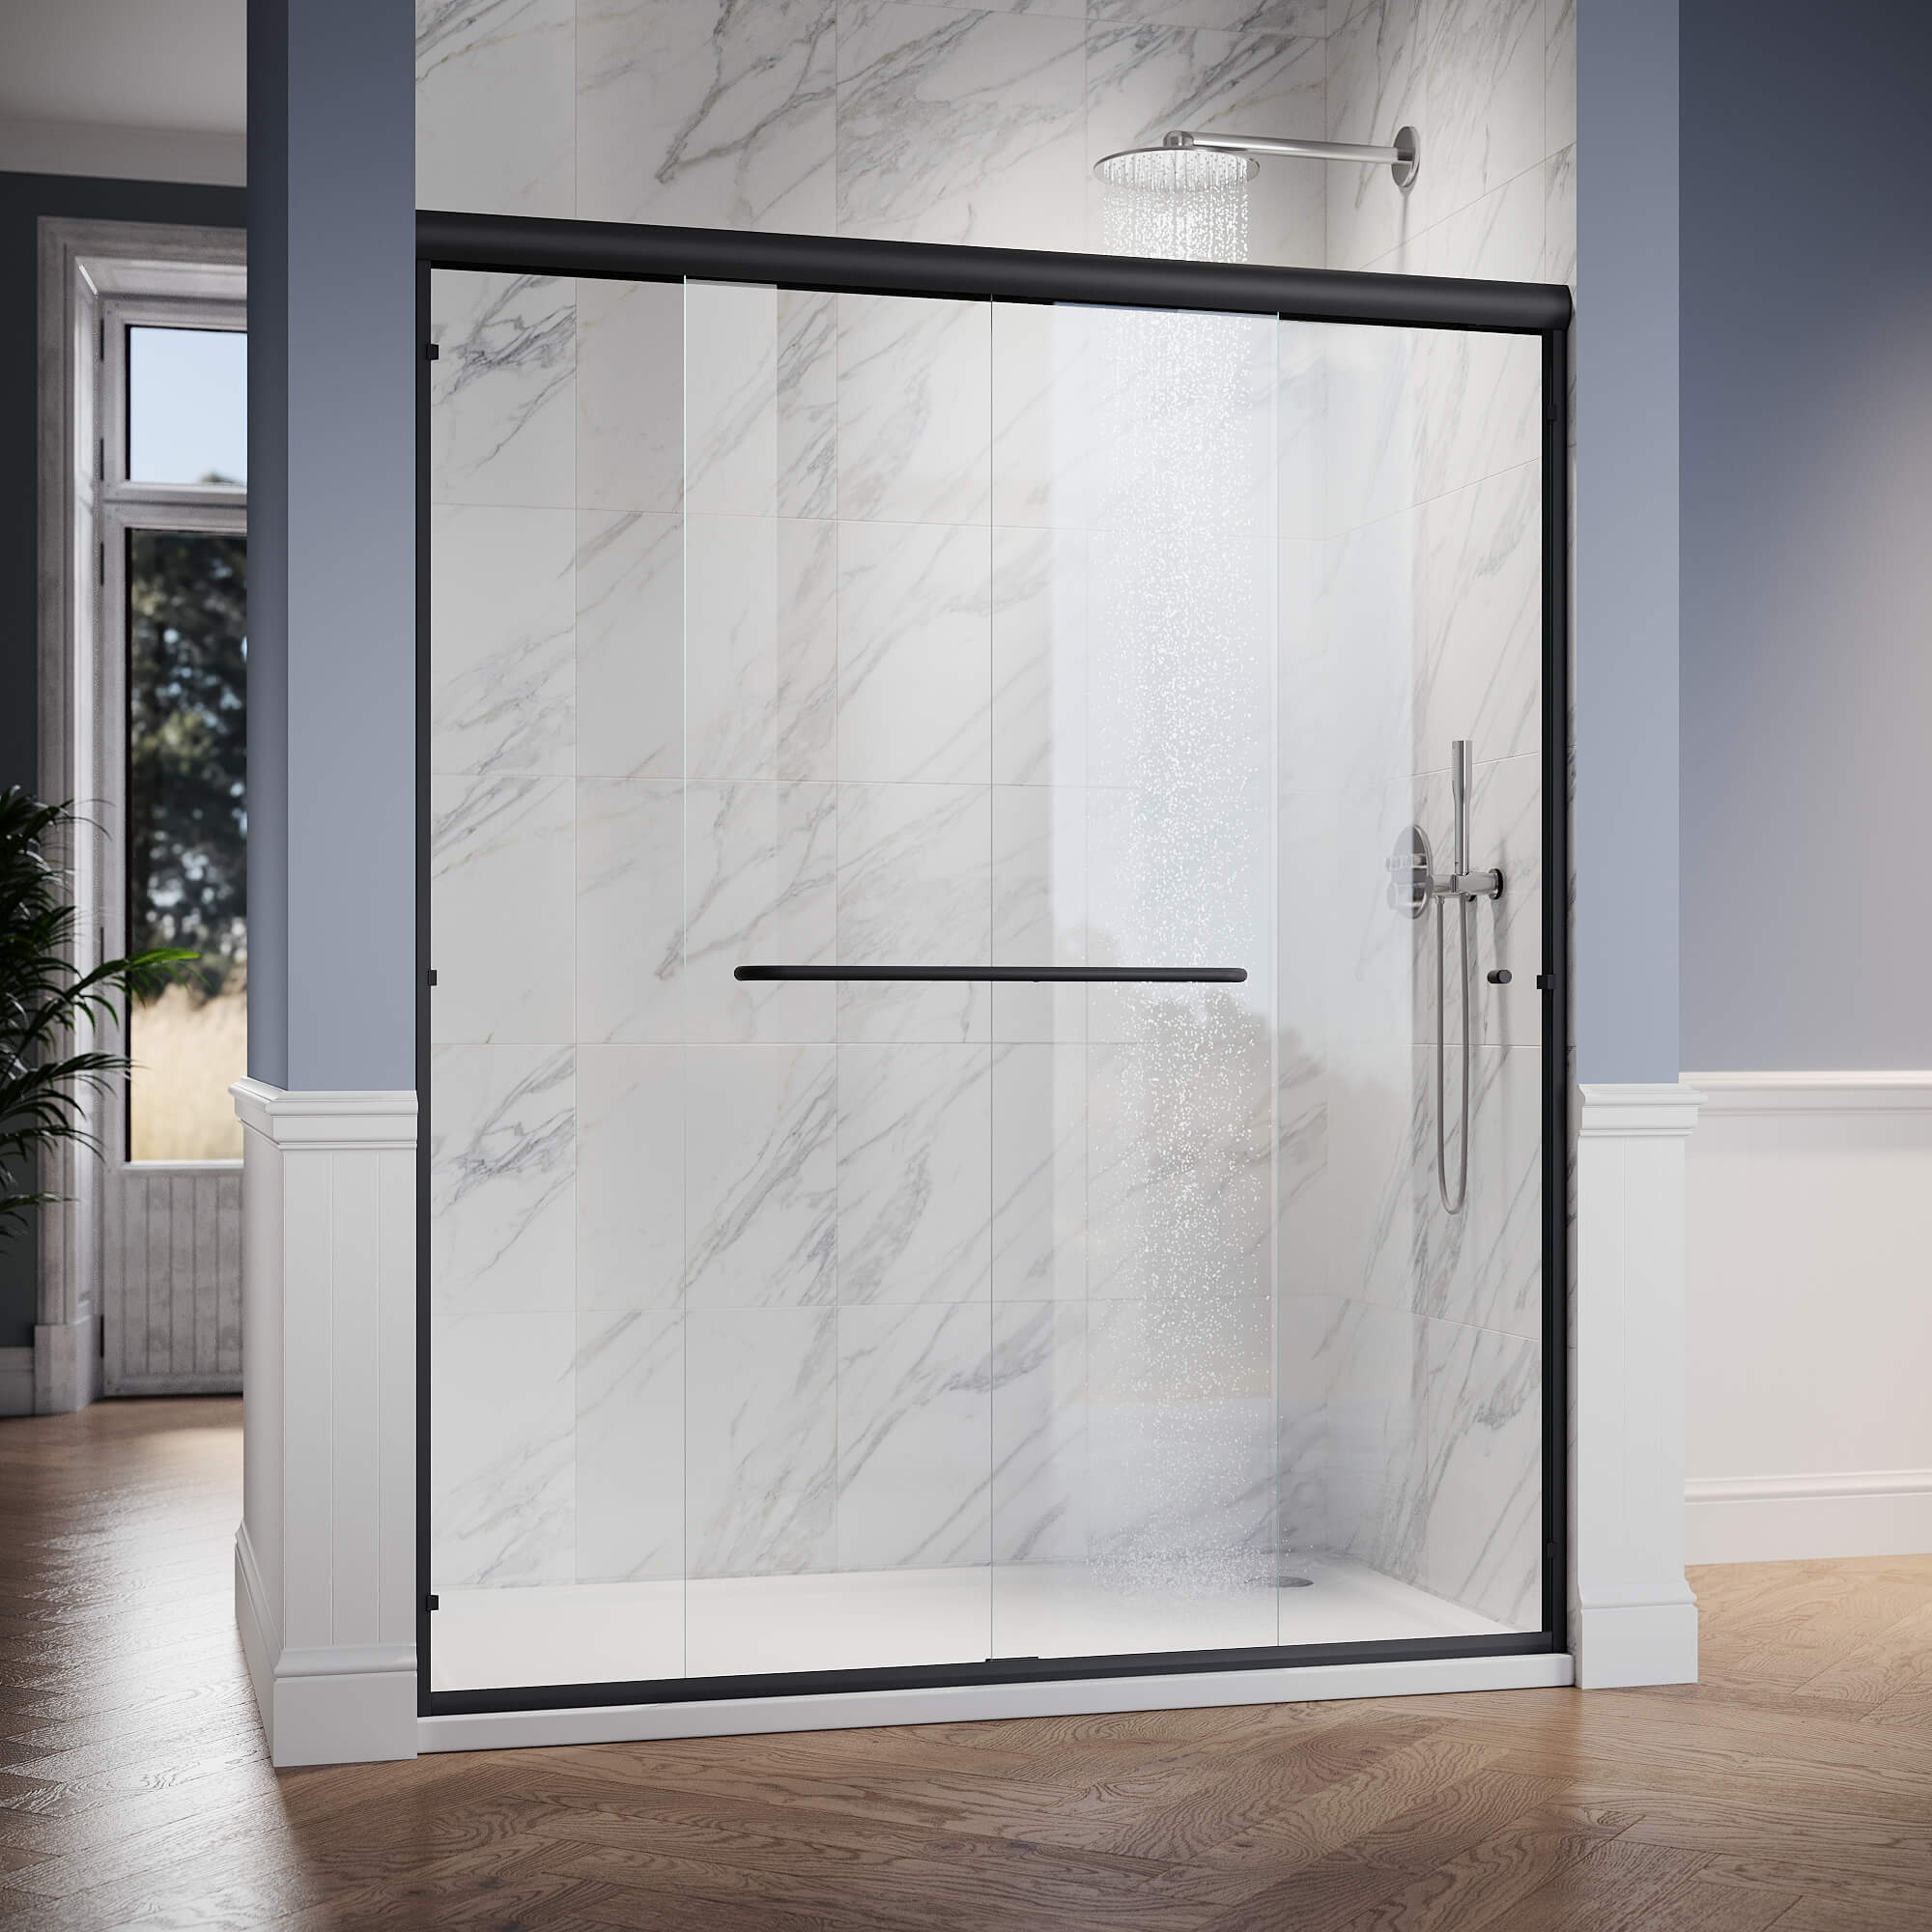
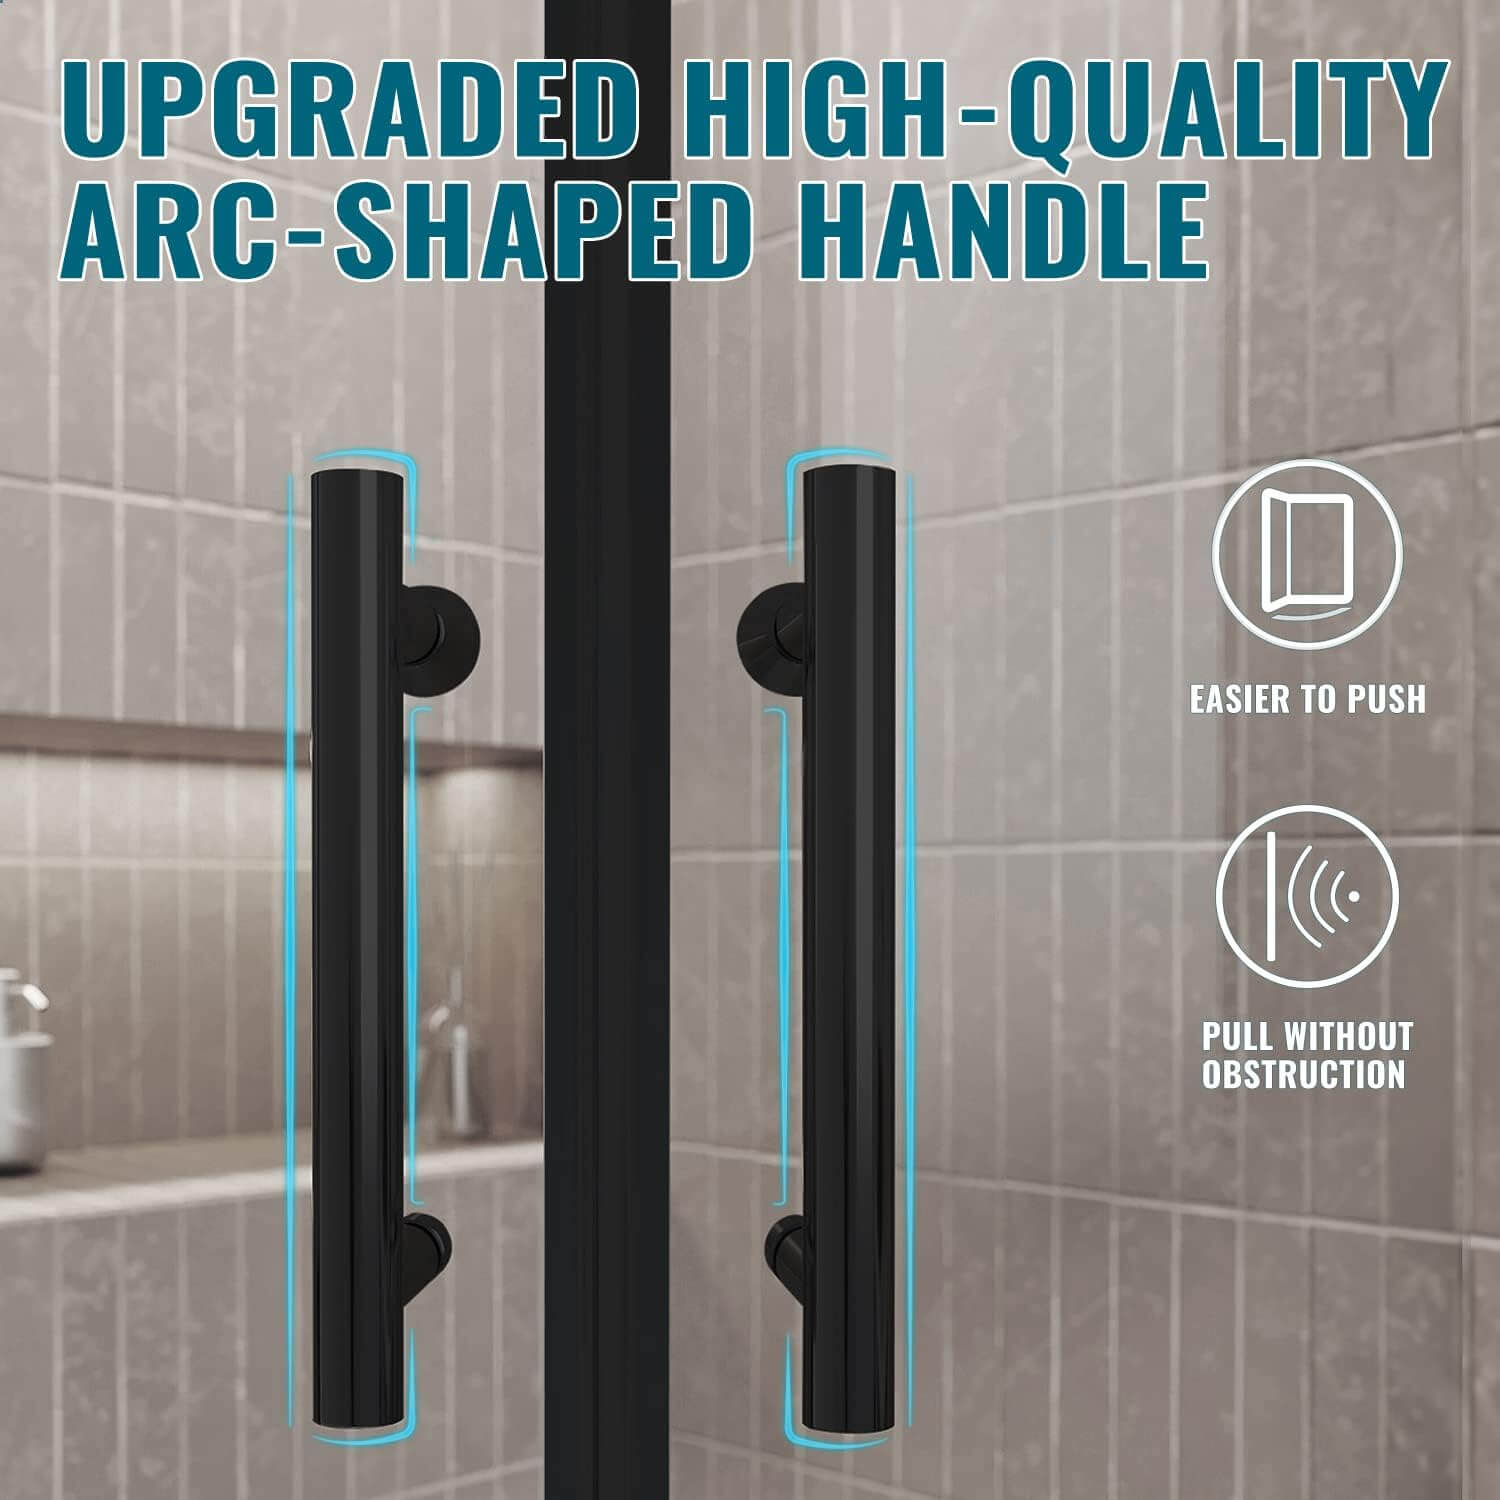
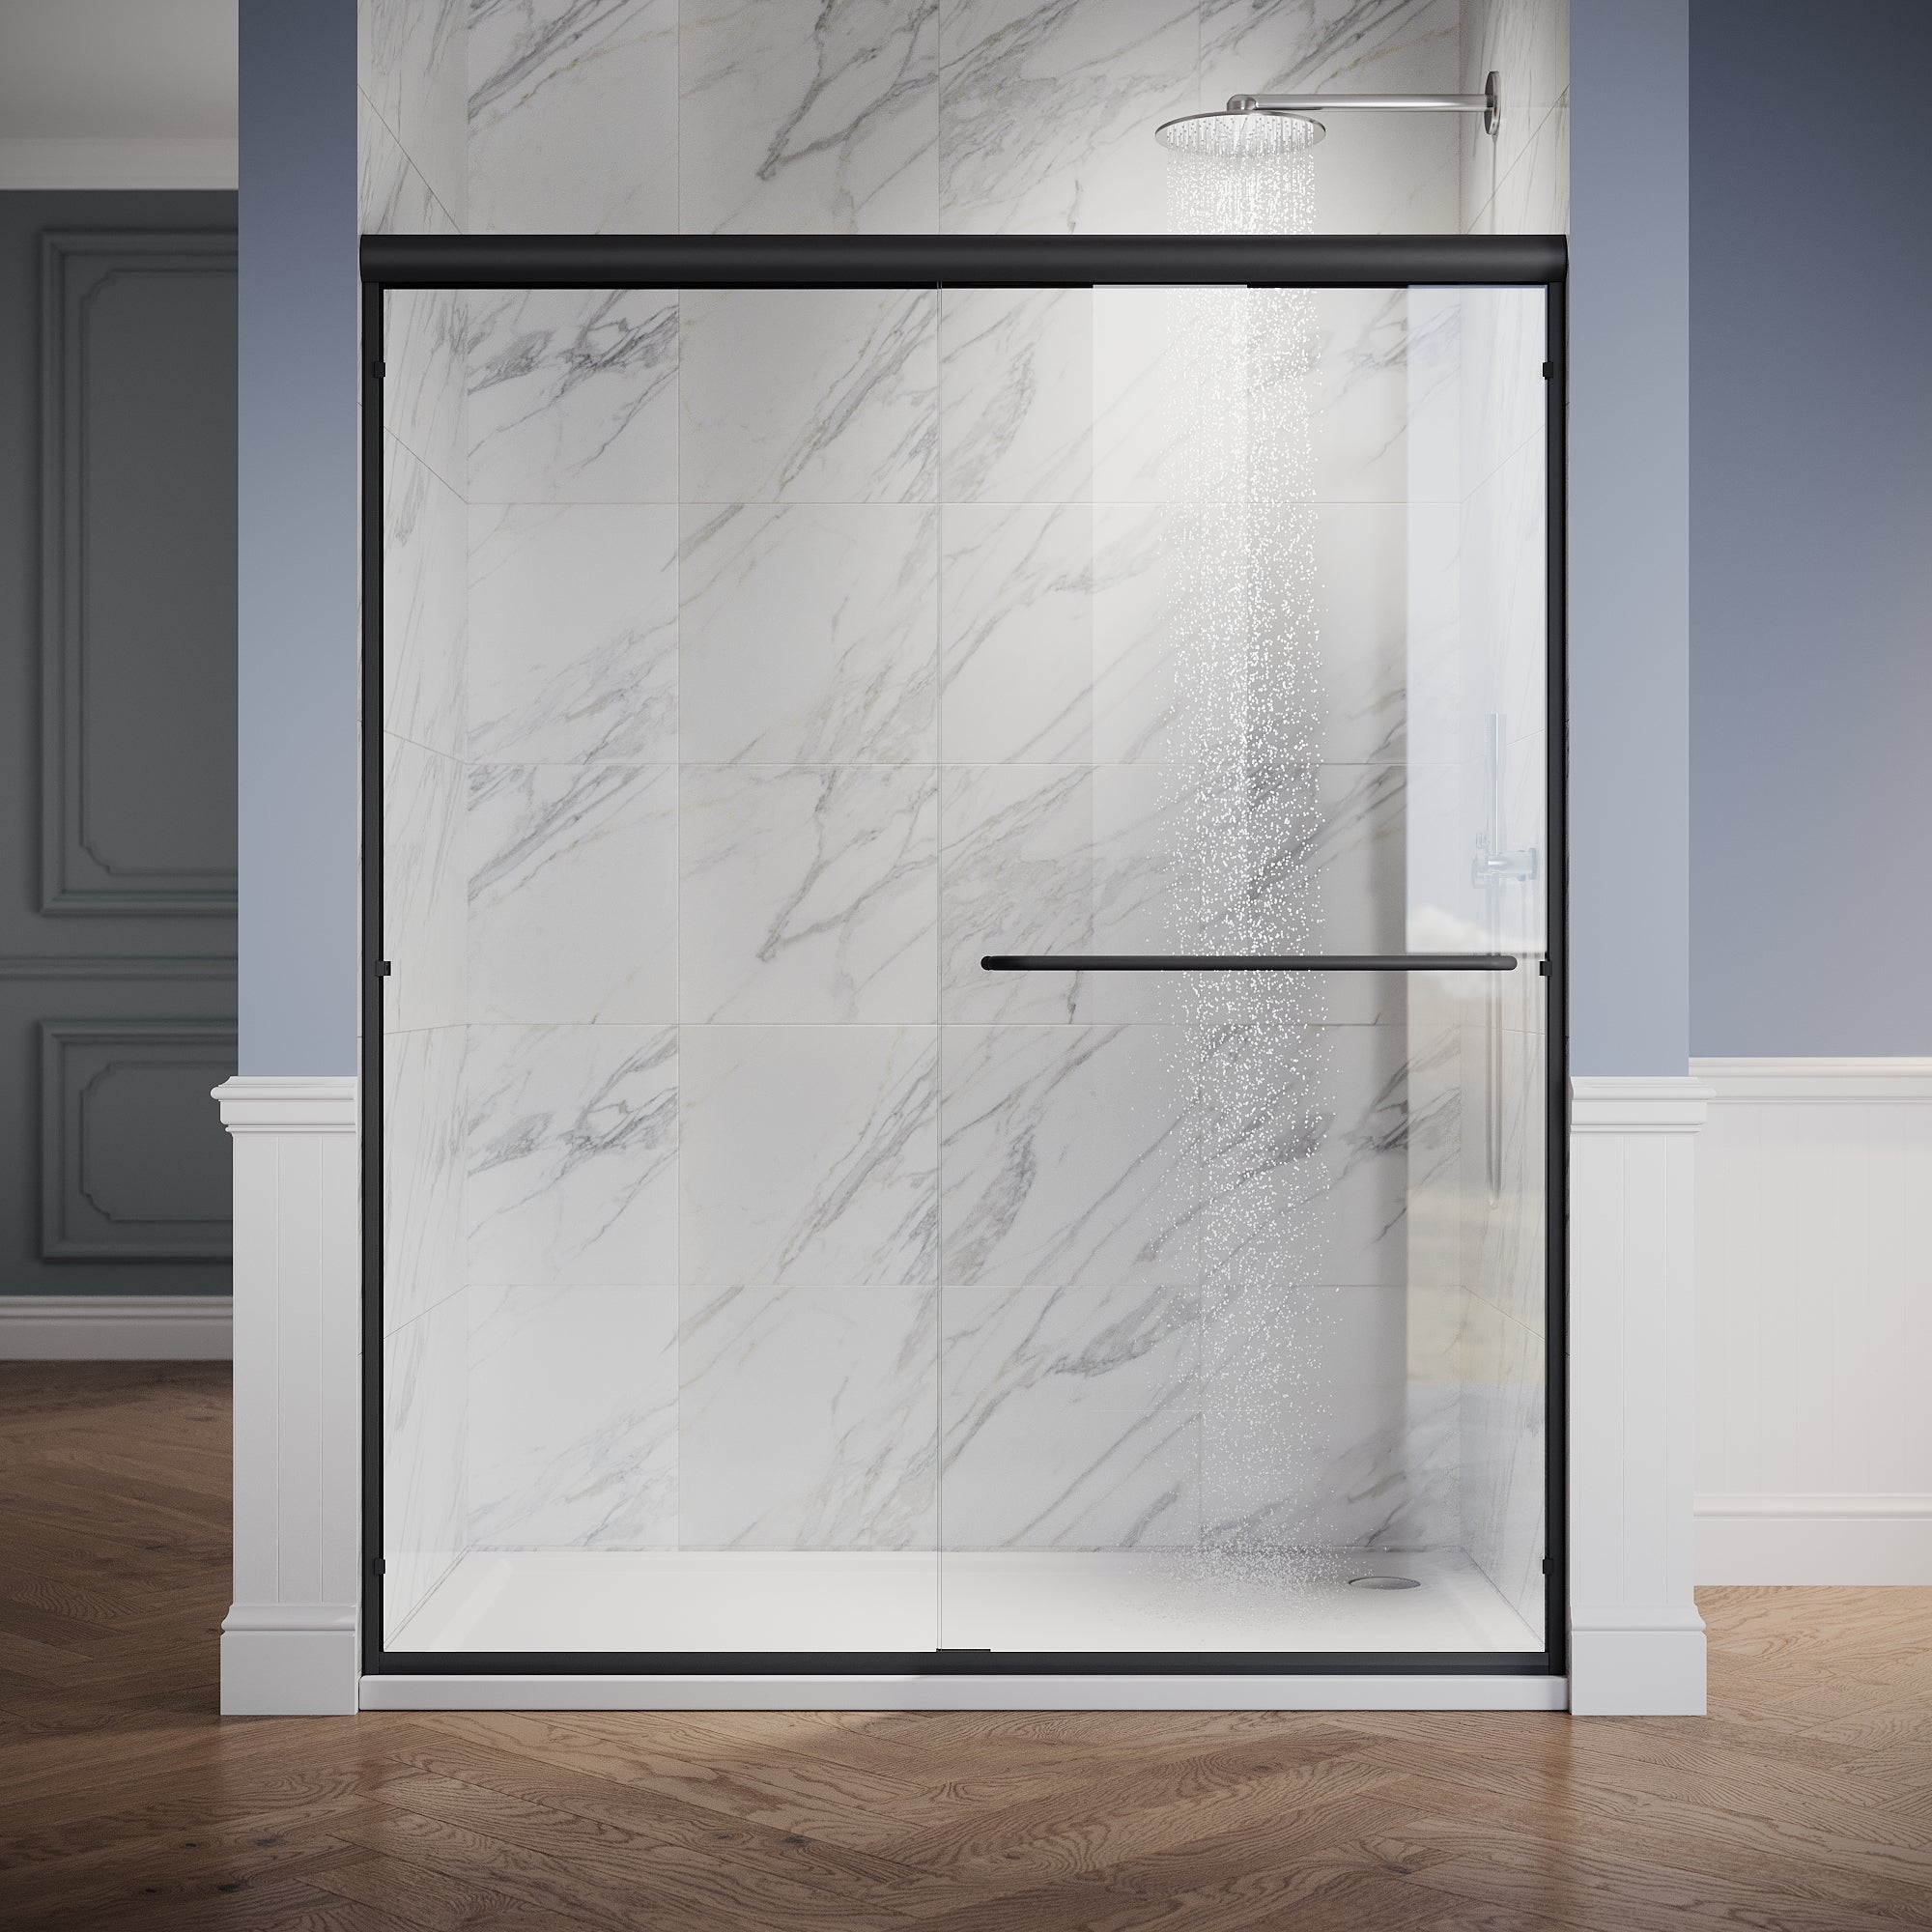
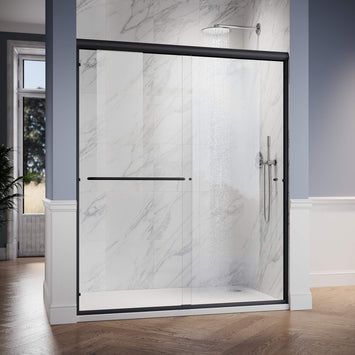
SUNNY SHOWER 1/4 inch Double Sliding Shower Doors, Black Finish / Brushed Nickel Finish / Chrome Finish / Gold Finish
Choose your option

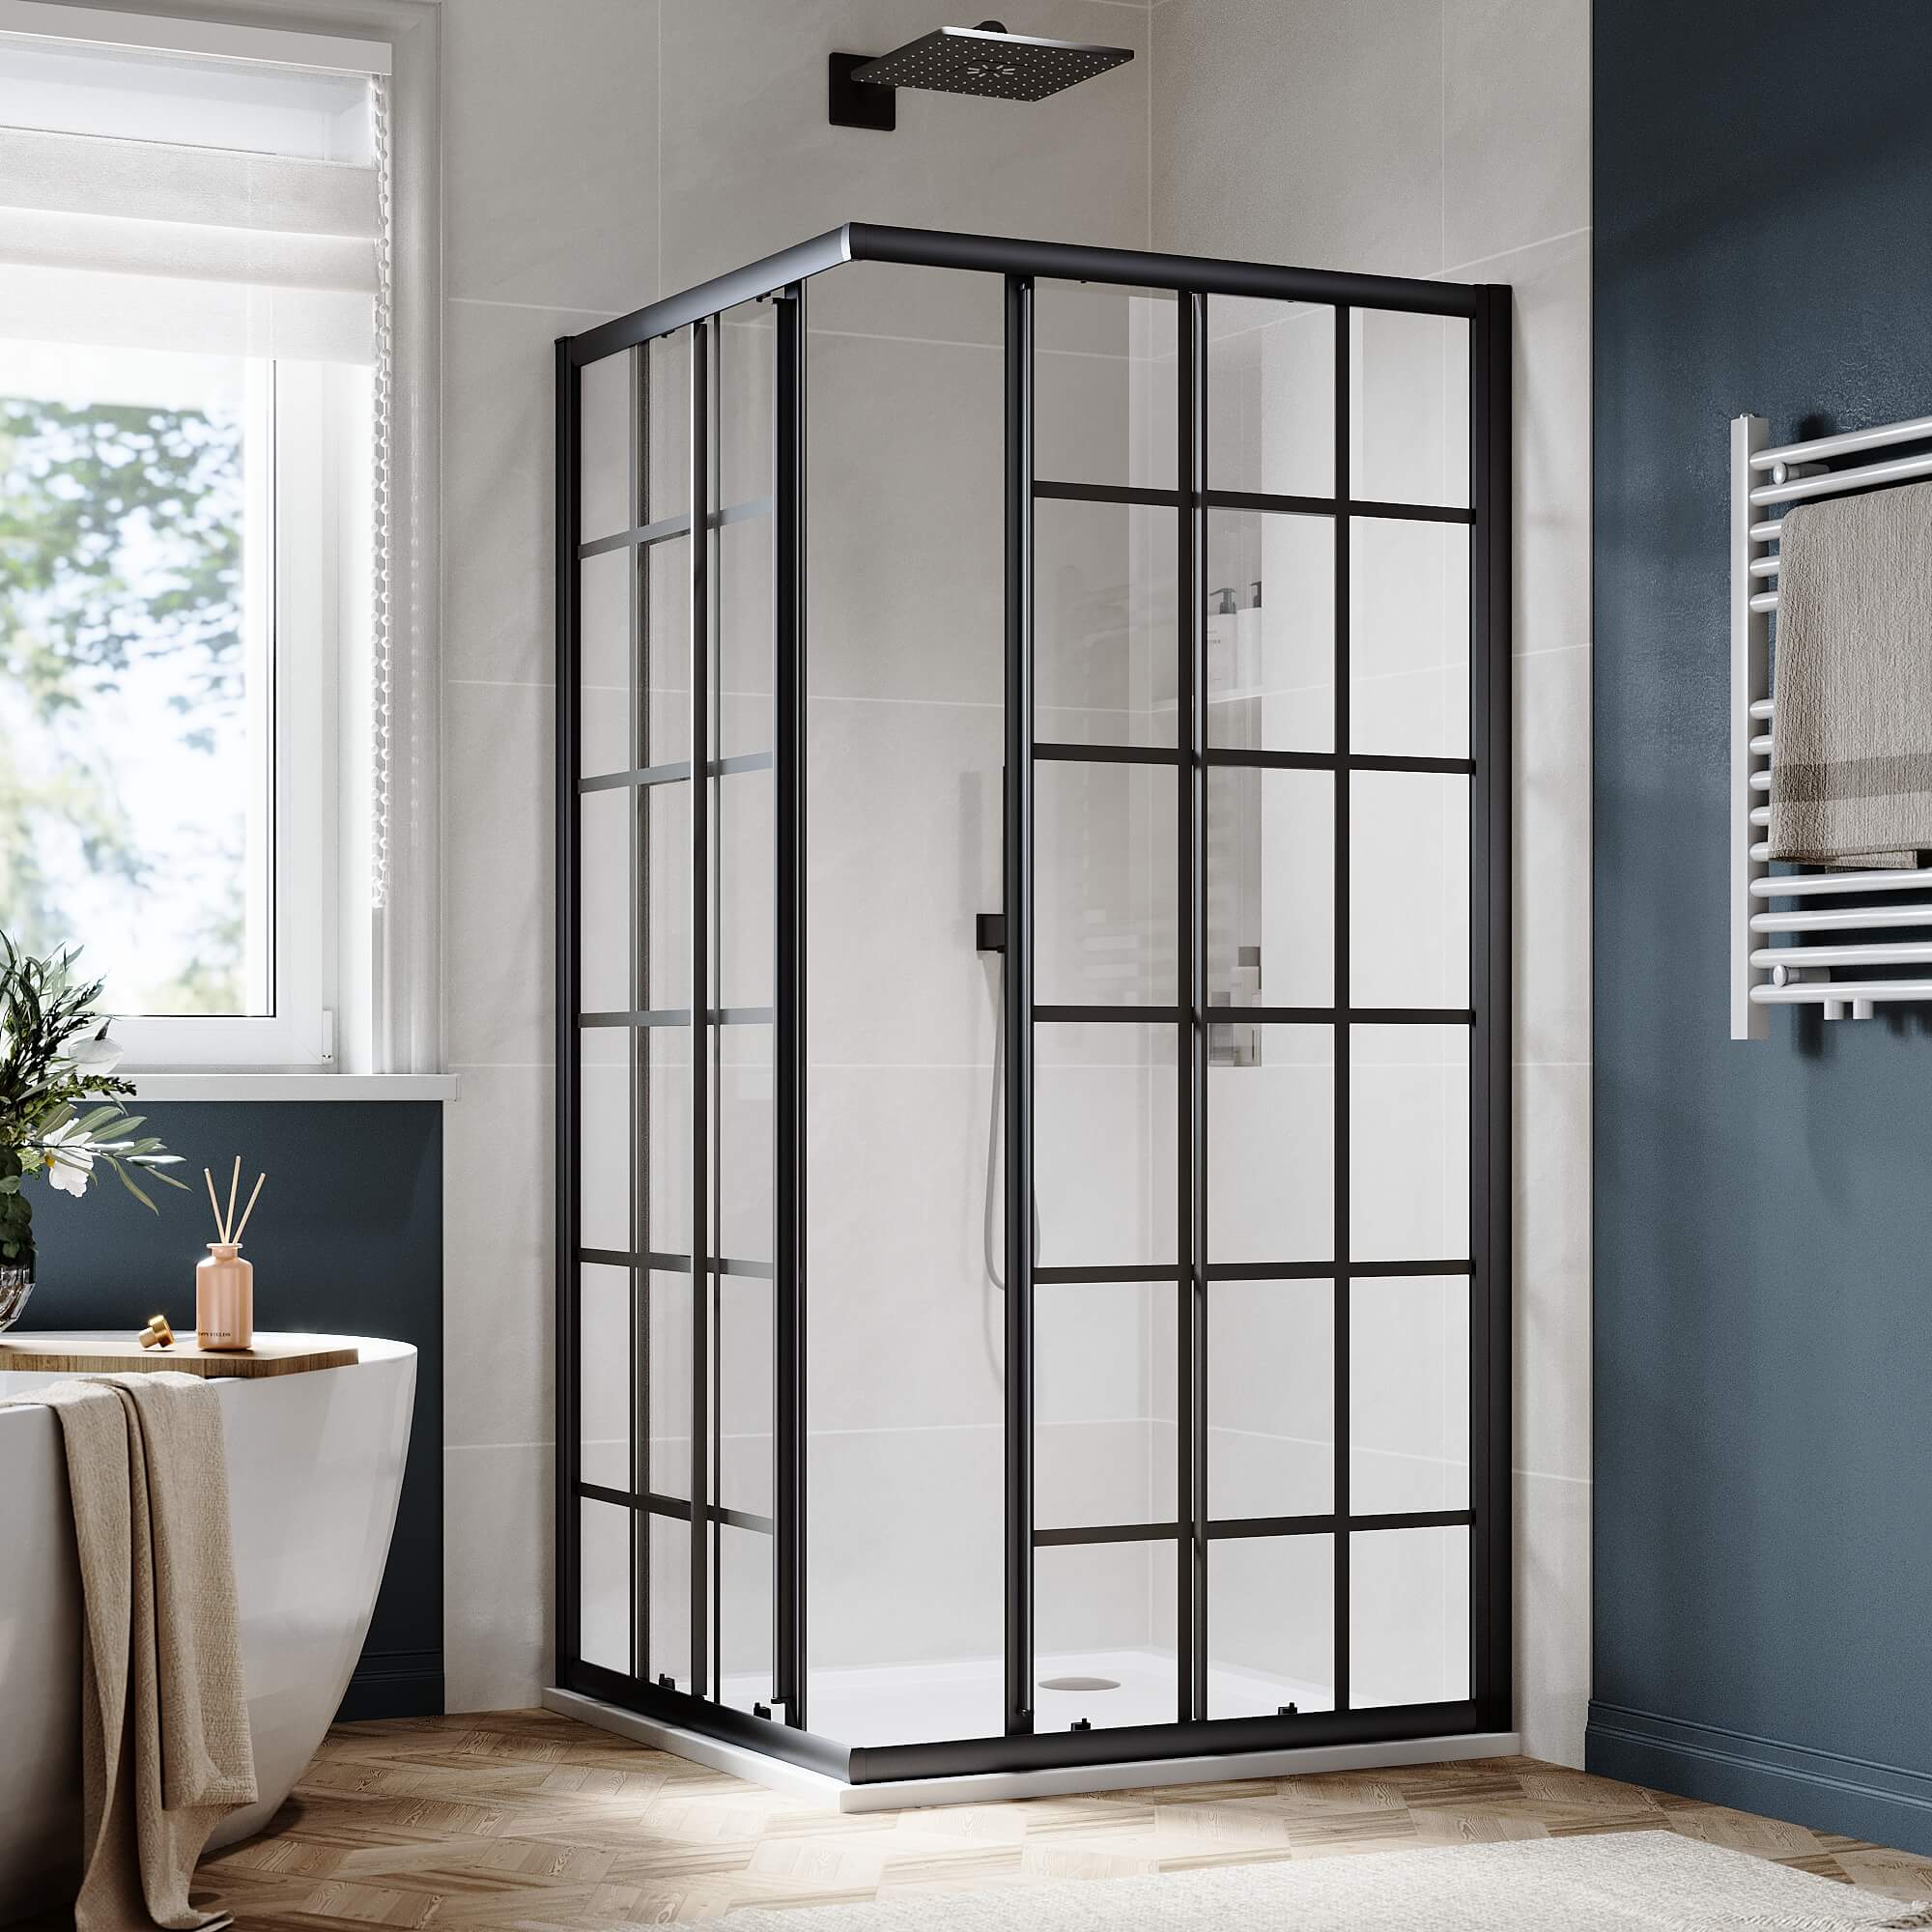
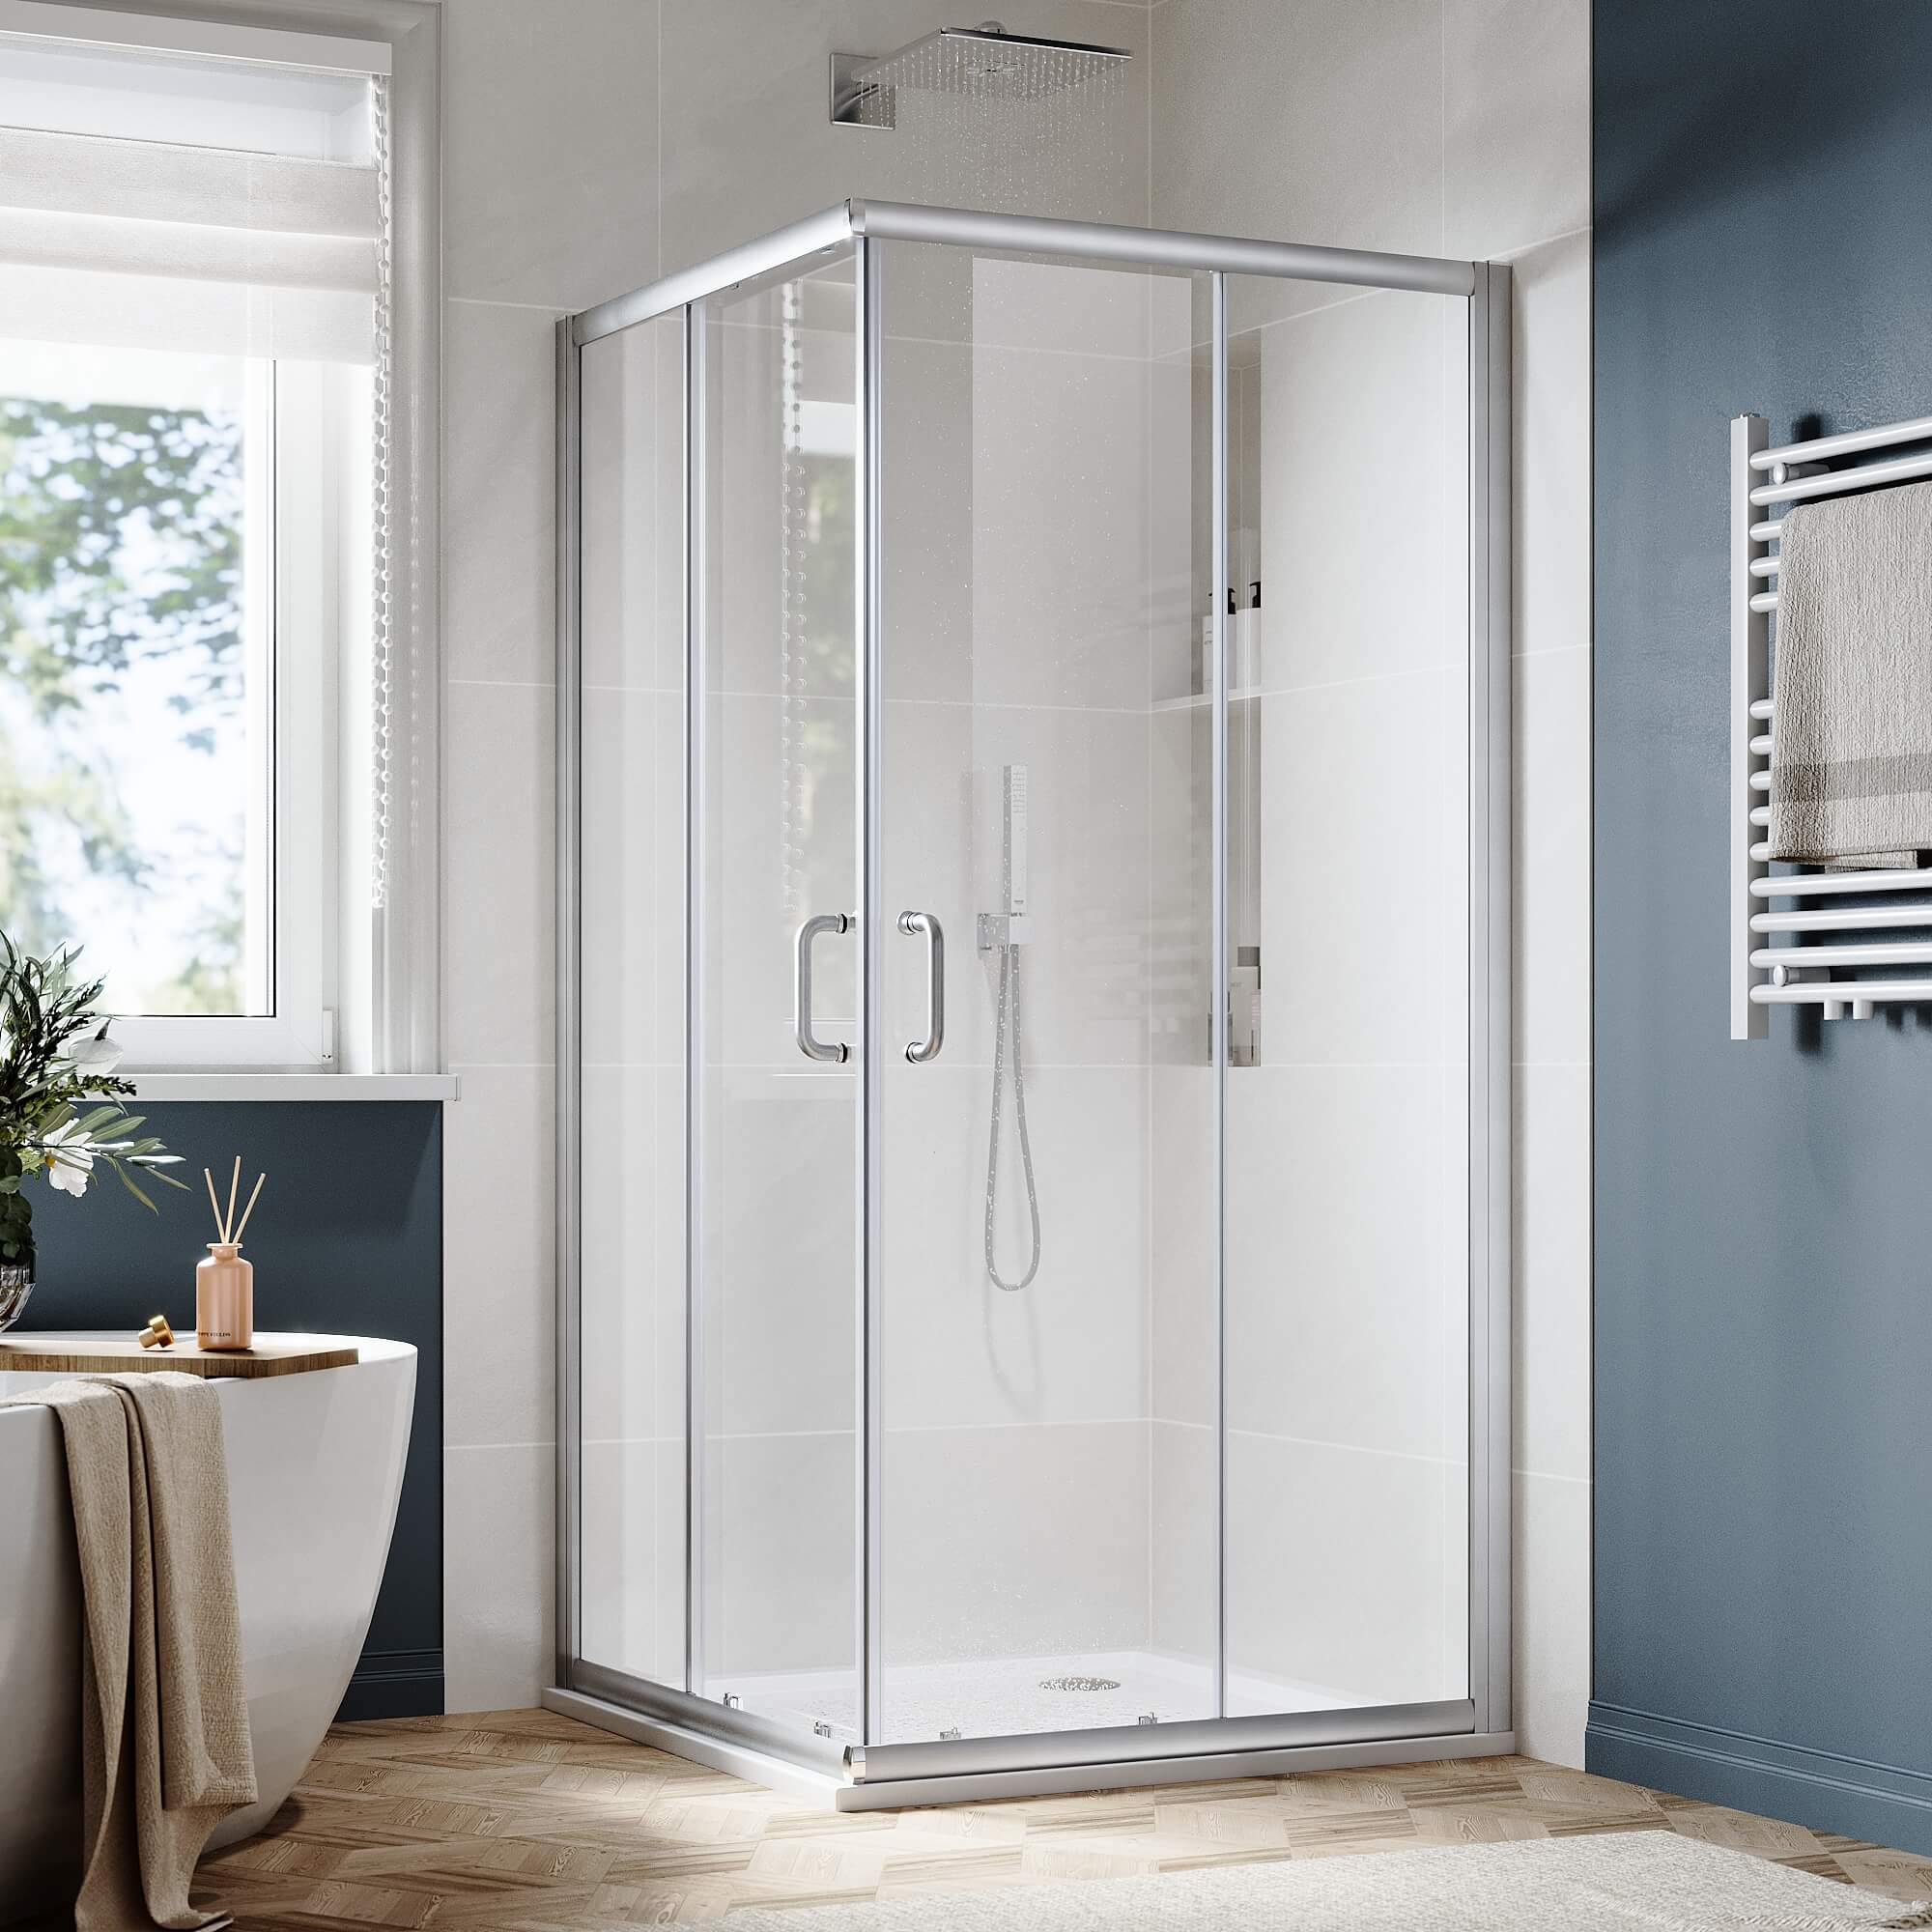
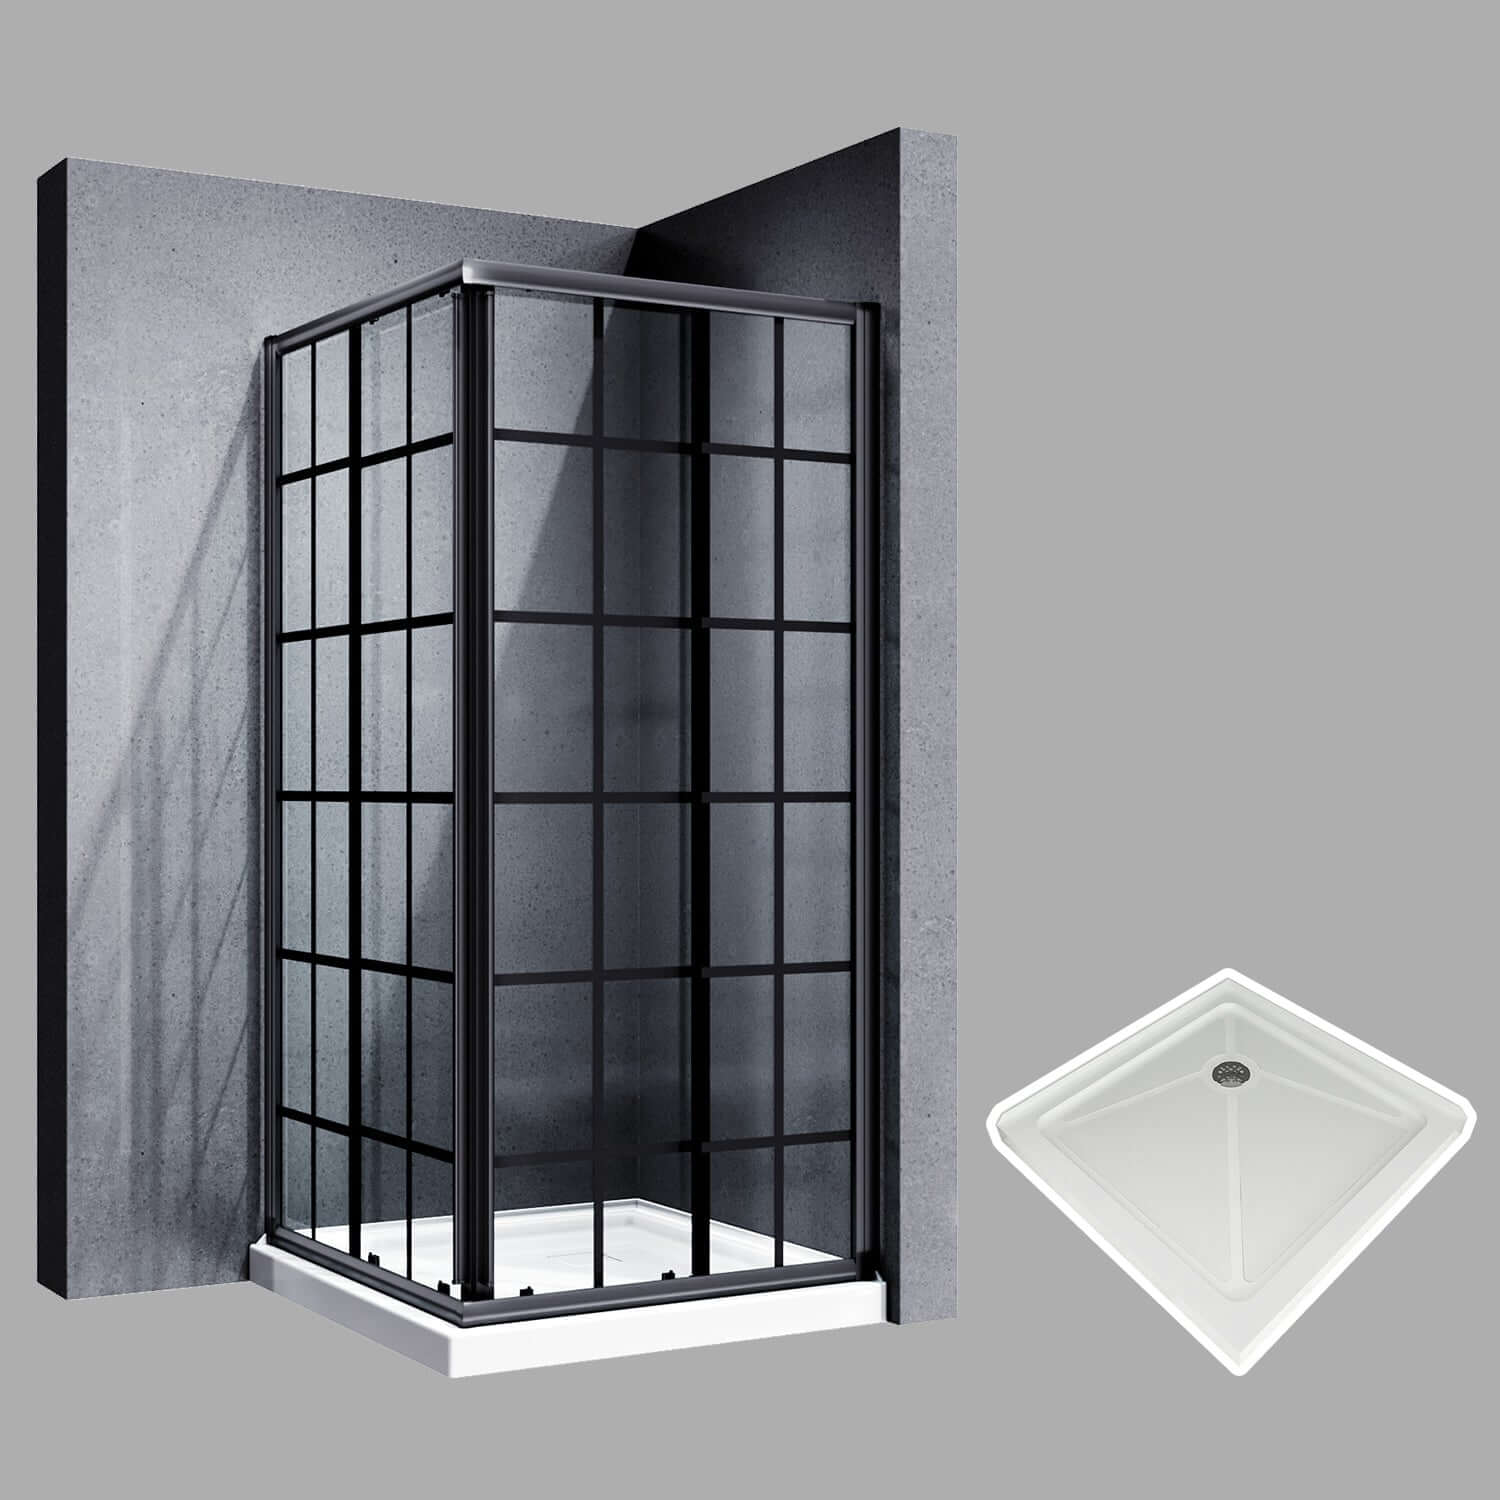
SUNNY SHOWER Corner Square Shower Enclosure with 1/4 in. Clear Tempered Glass Double Sliding Shower Doors, Black Brushed Nickel
Choose your option
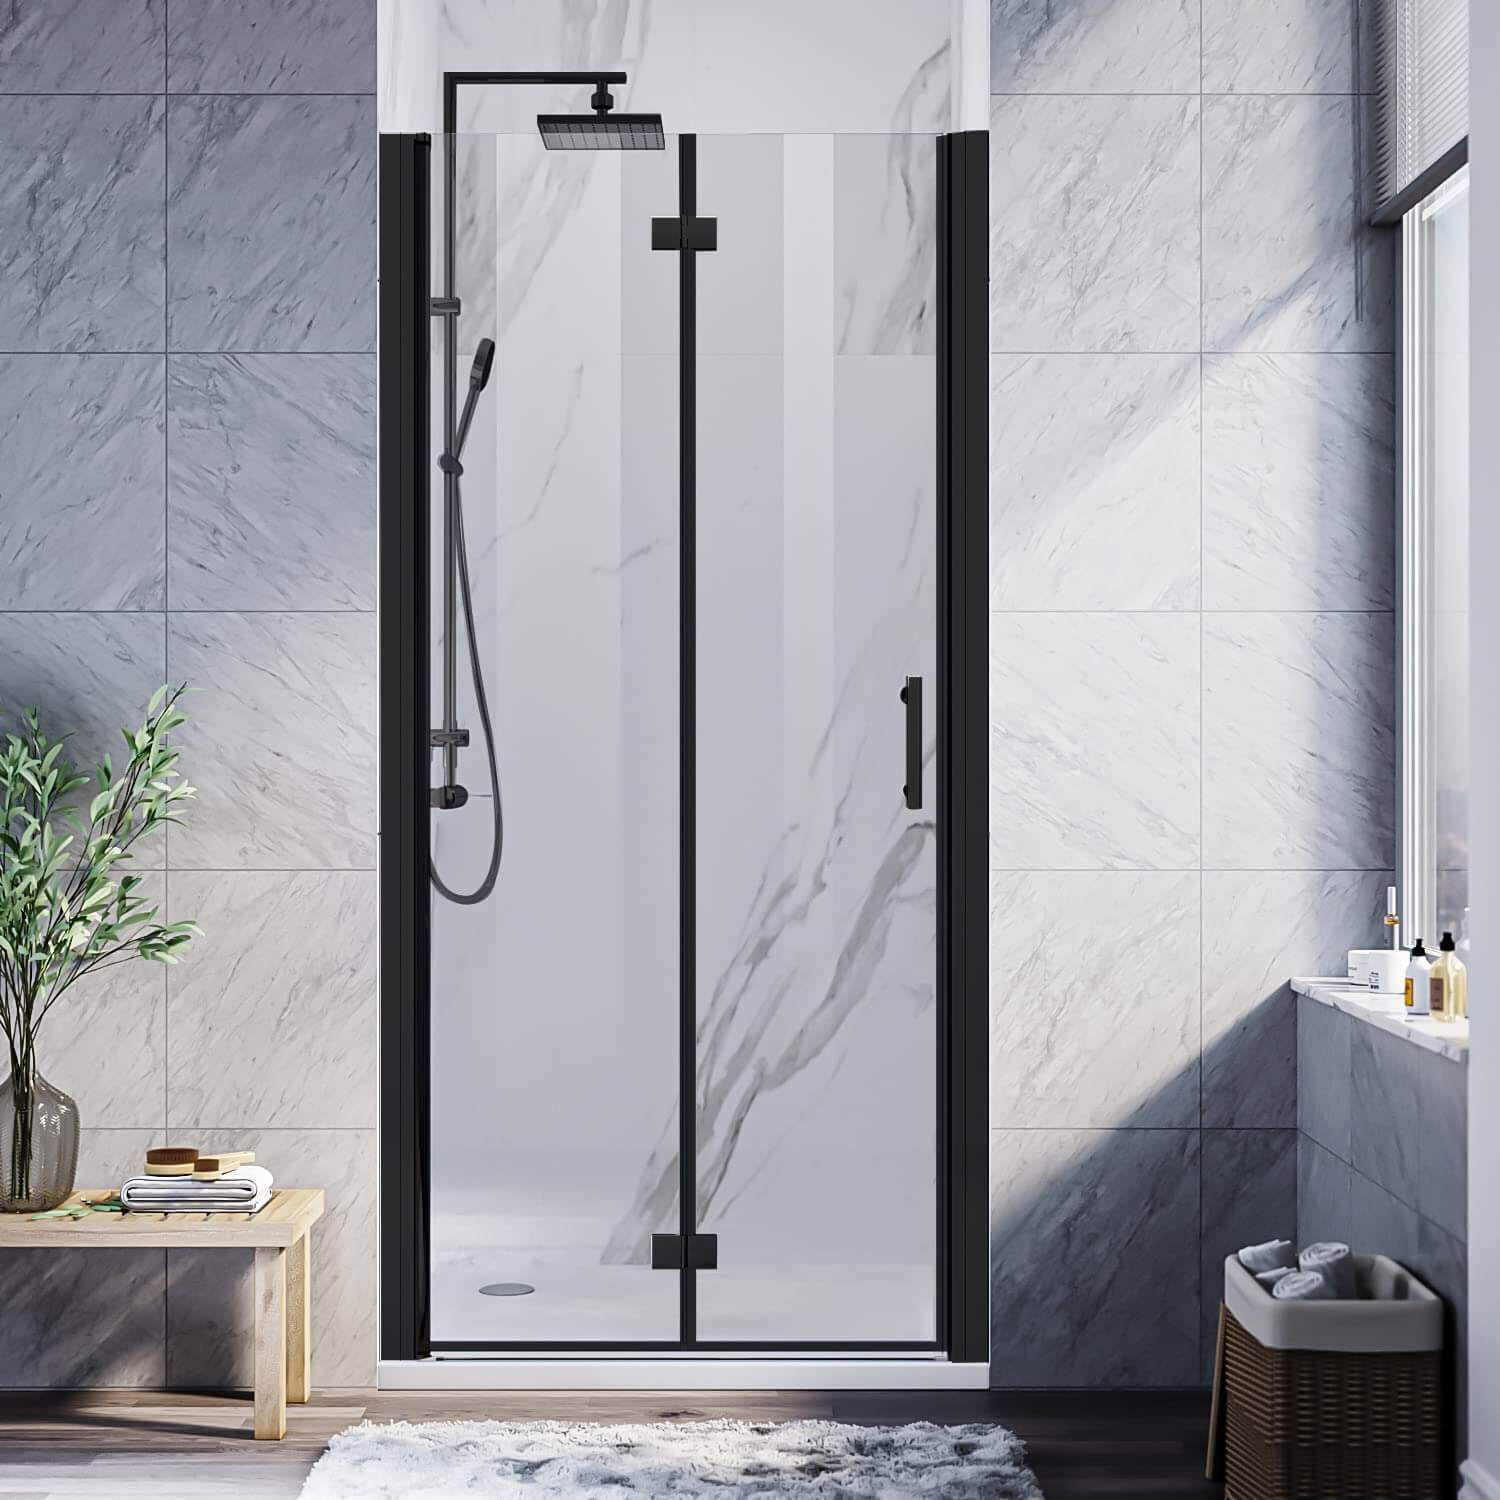

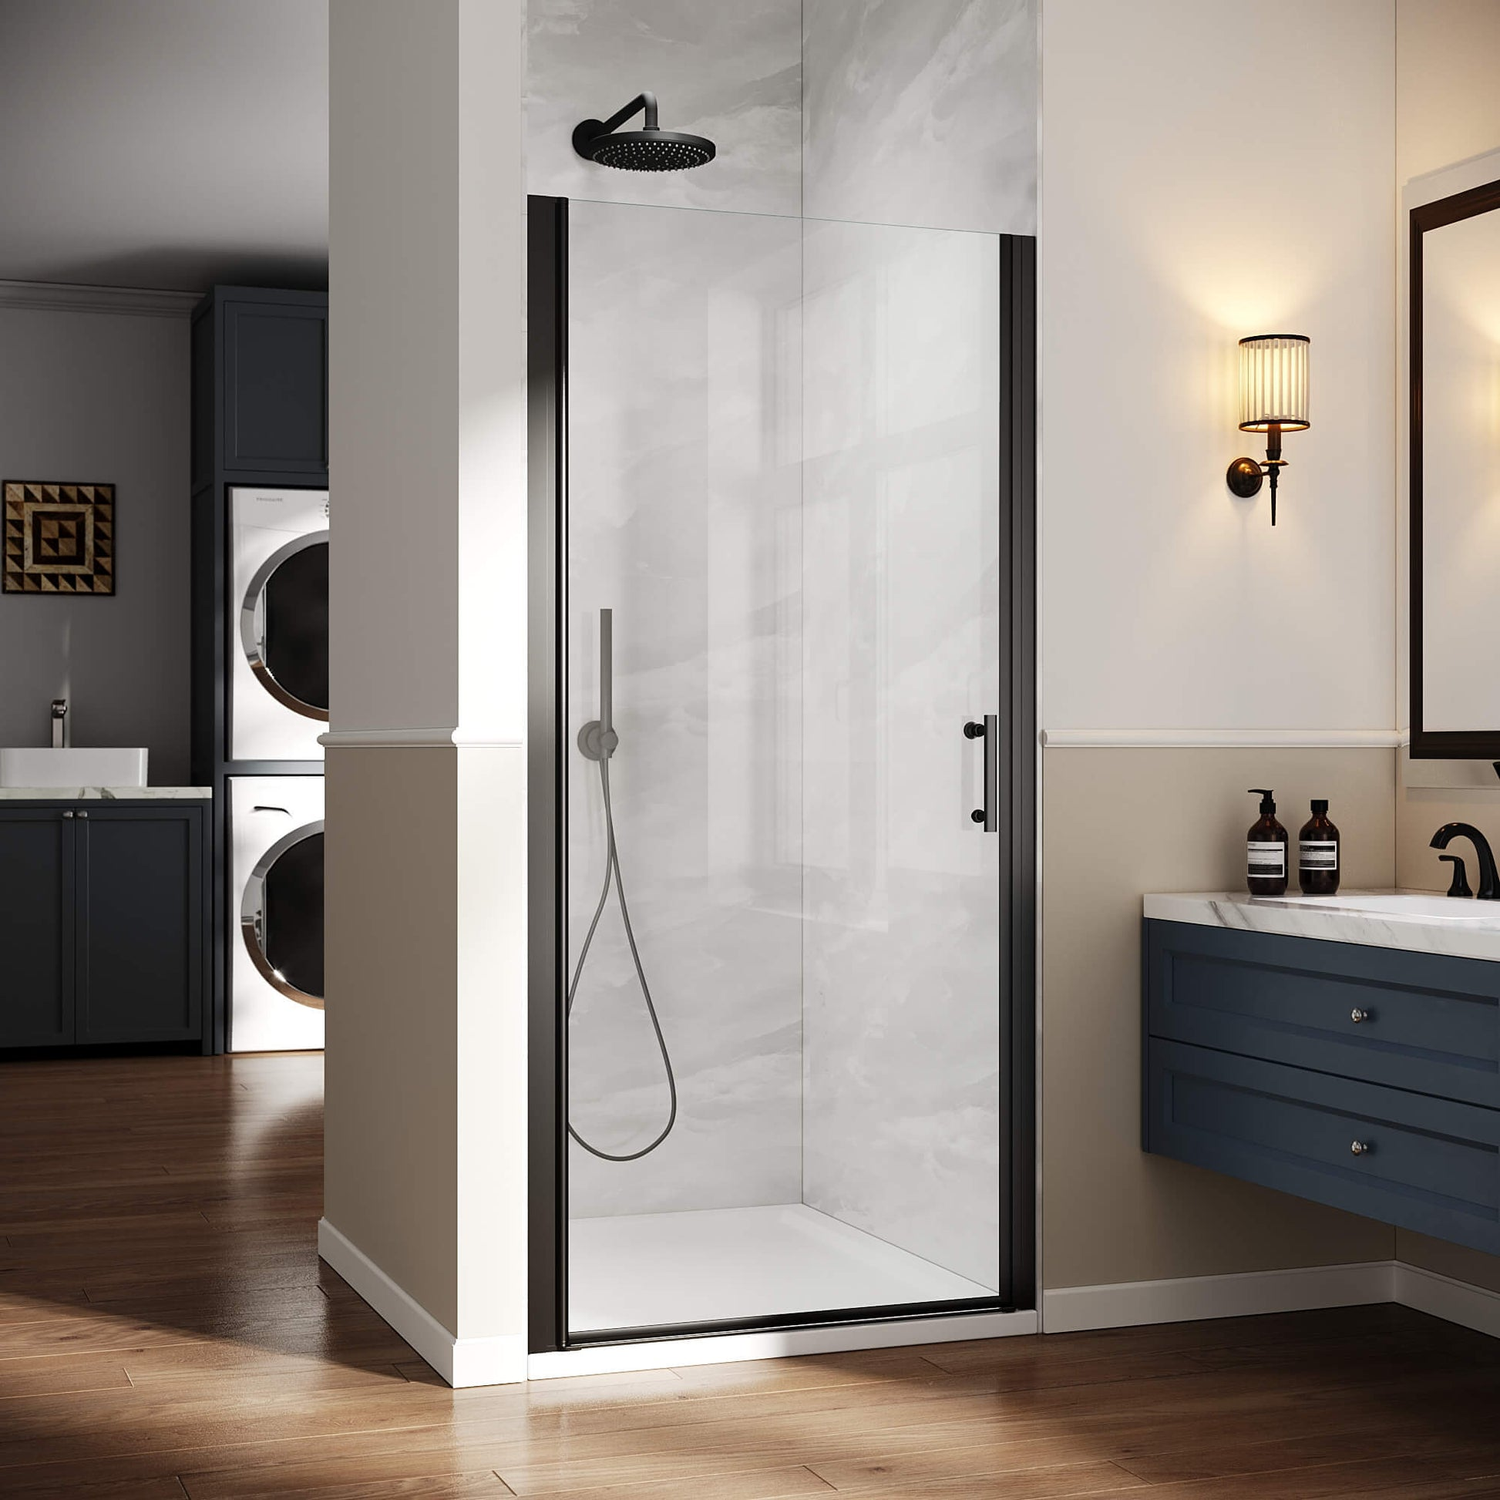
SUNNY SHOWER 1/4 inch Bifold Shower Door with Semi-Frameless Clear Tempered Glass, Black Finish / Chrome Finish
Choose your option
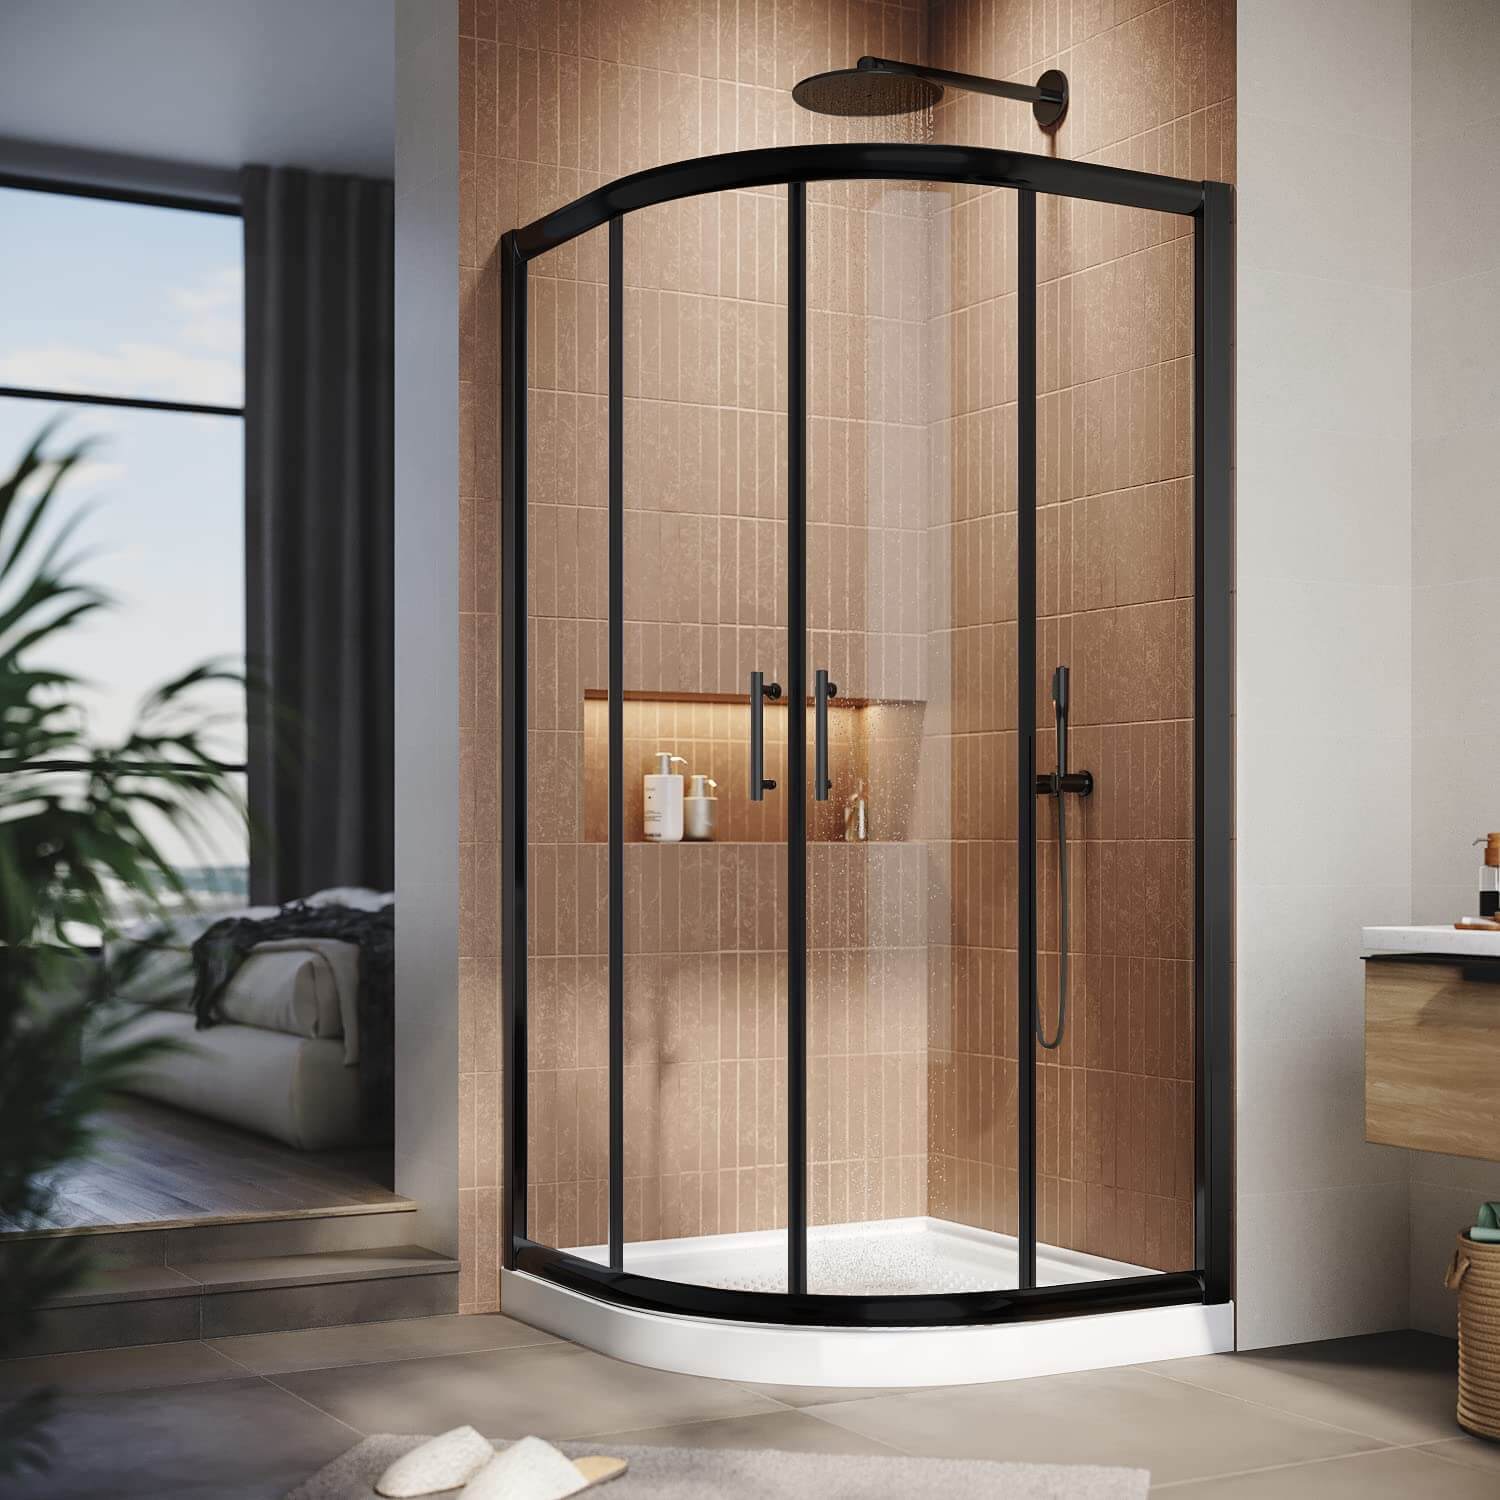
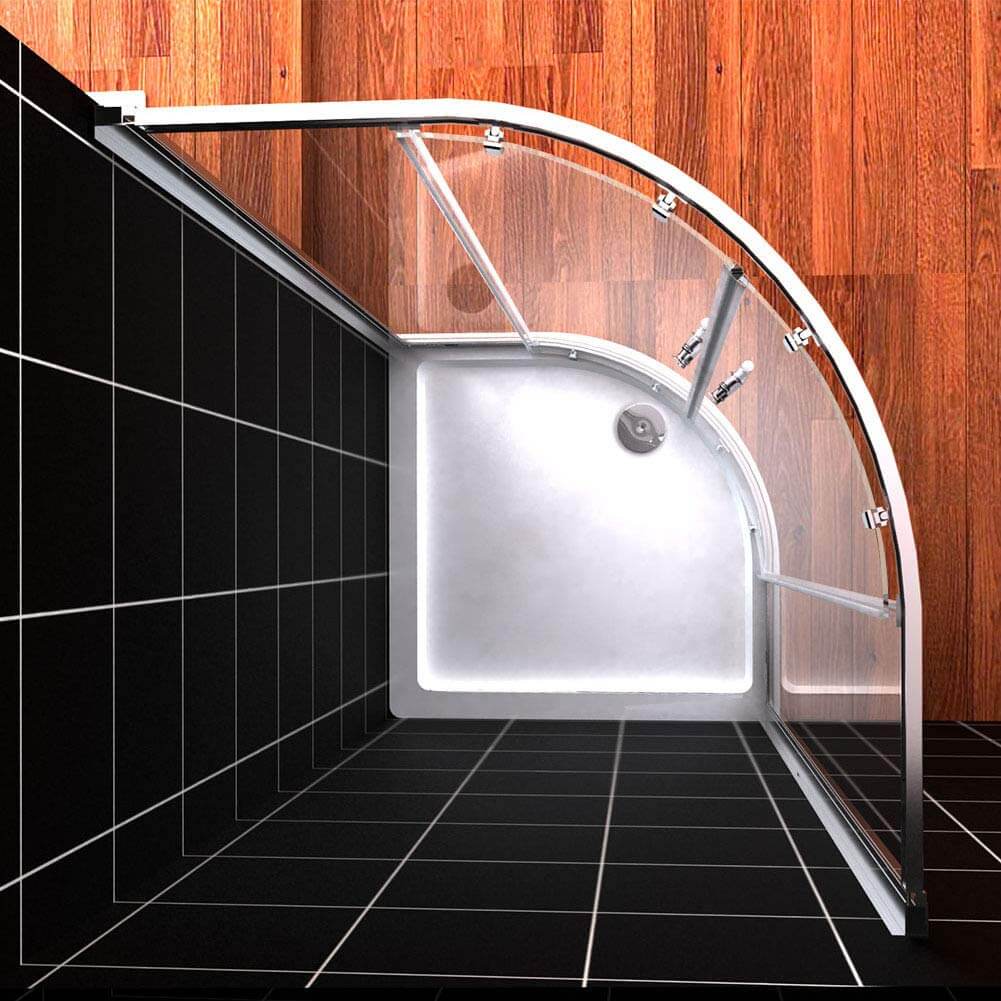
SUNNY SHOWER Corner Round Shower Enclosure with 36.7 in. W x 36.7 in. D x 72 in. H Double Sliding Doors, Black Finish / Chrome Finish
Choose your option
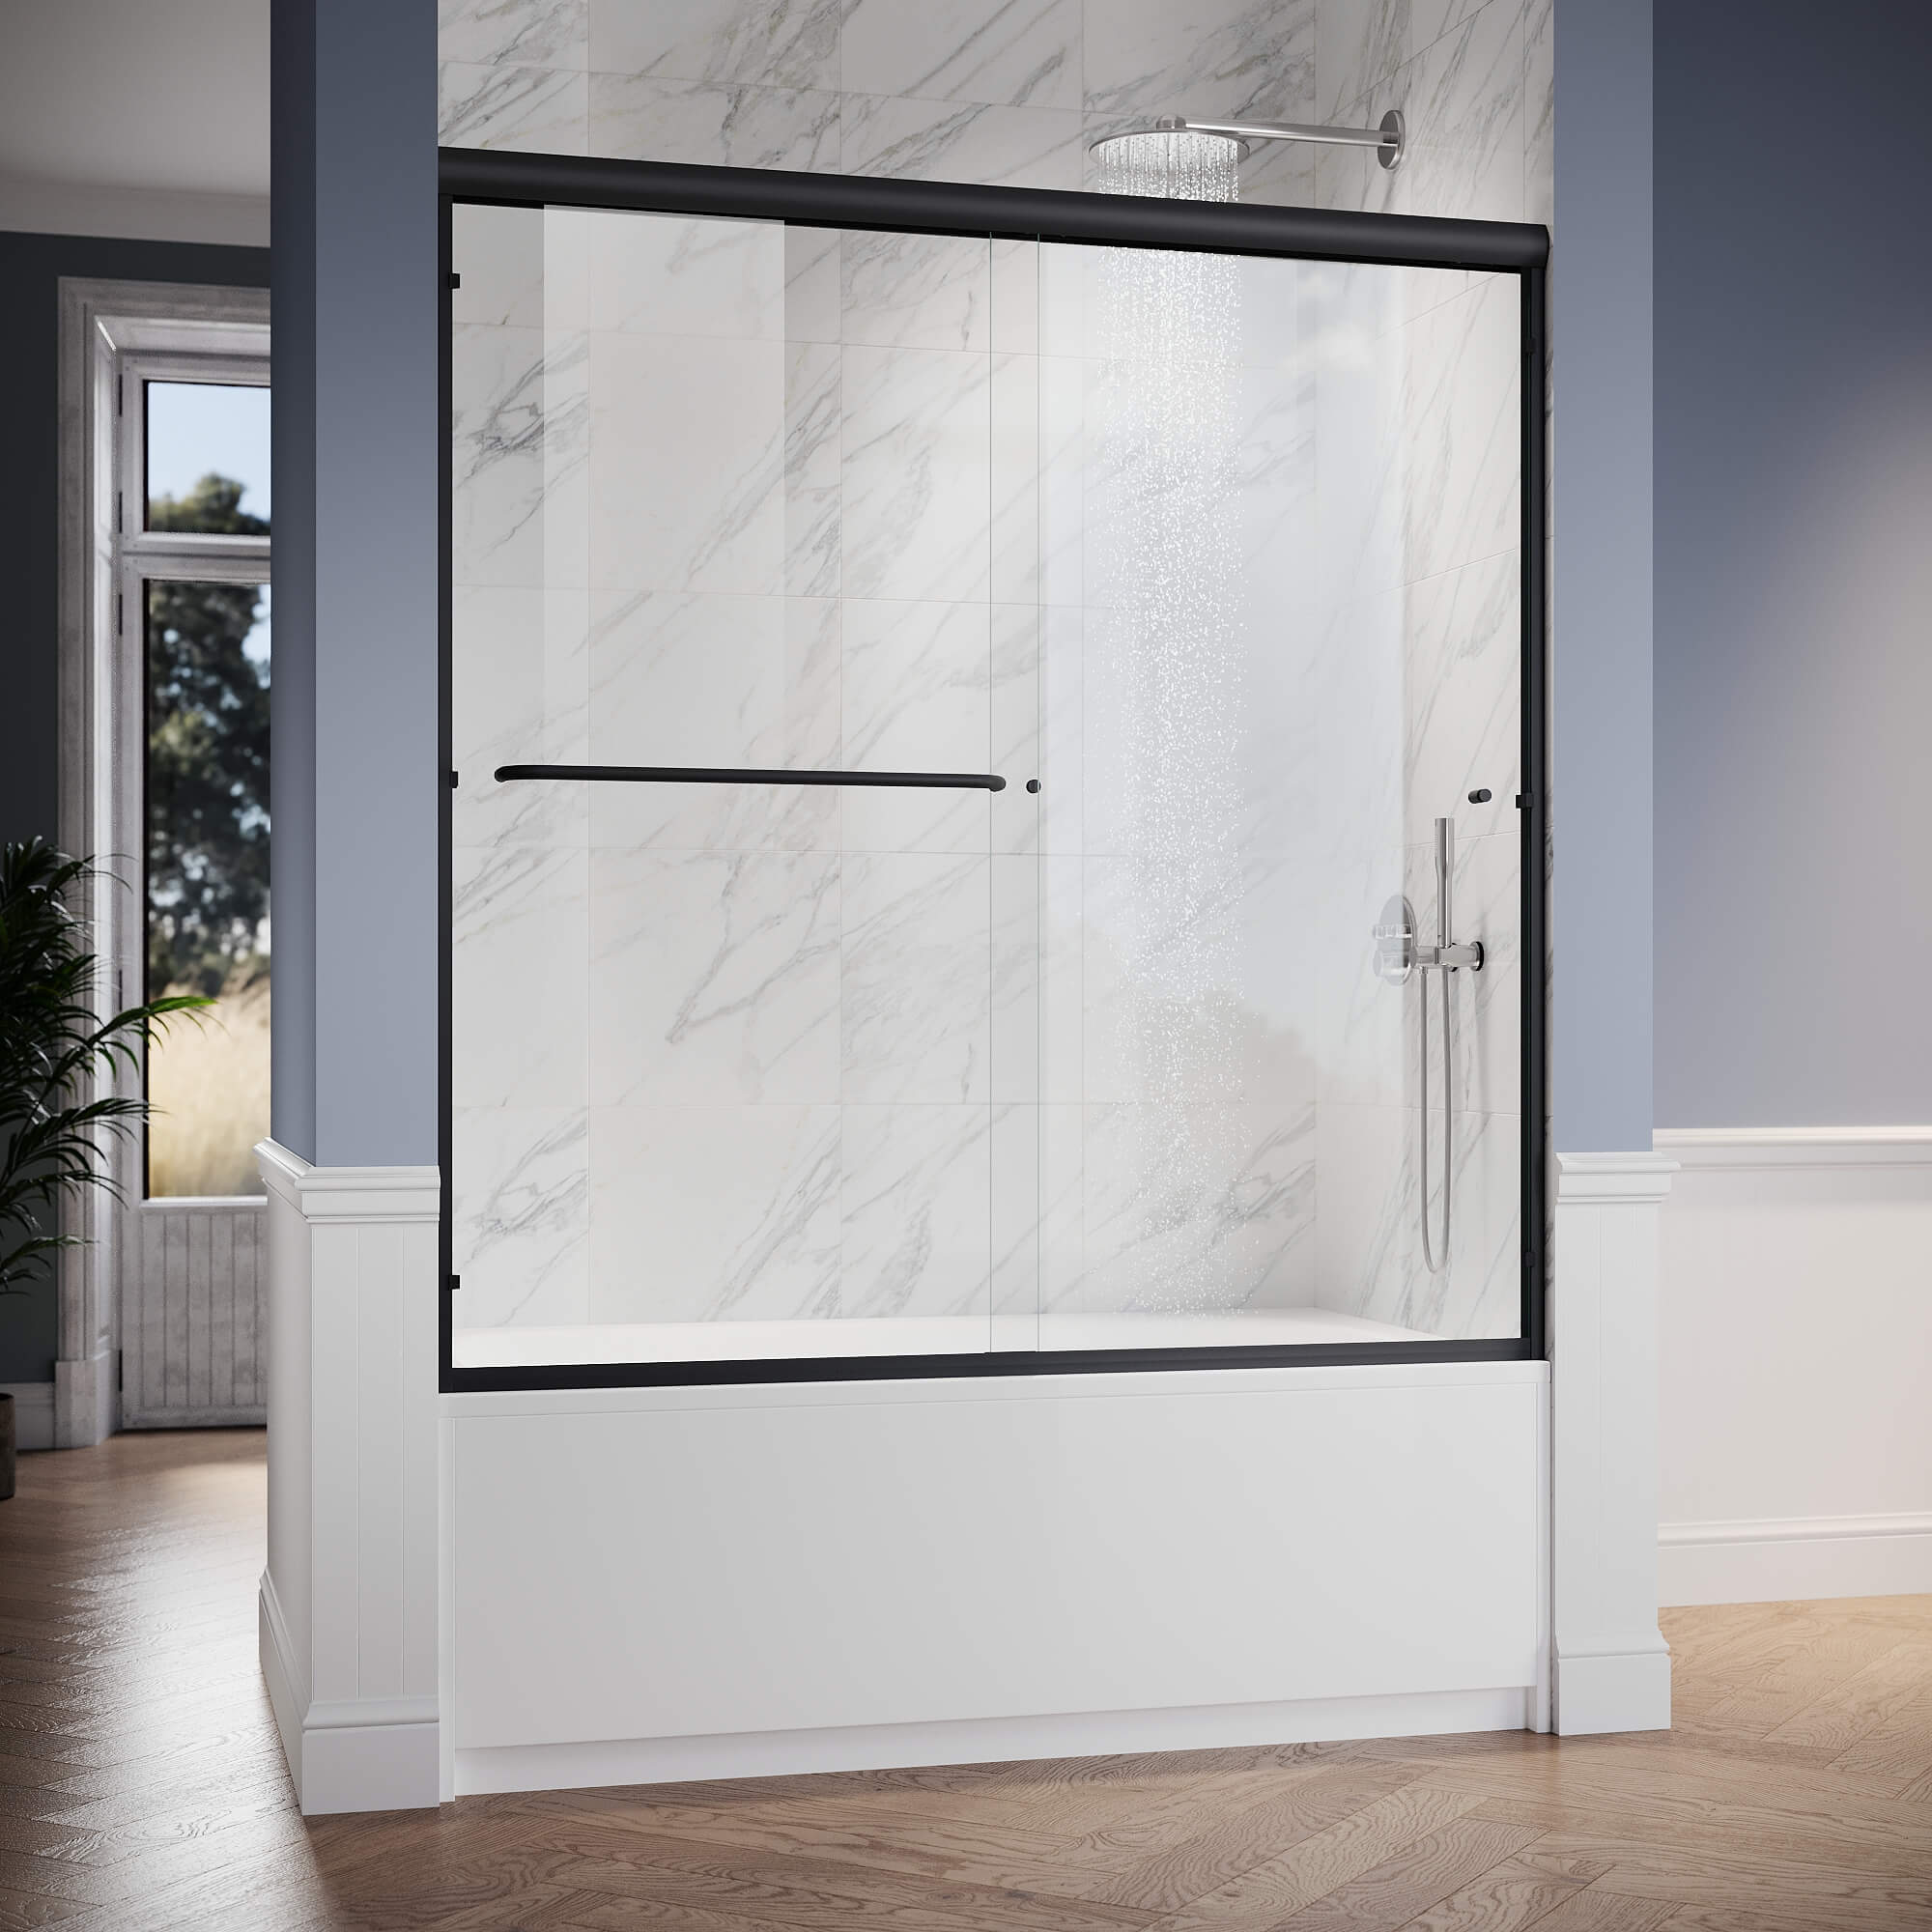
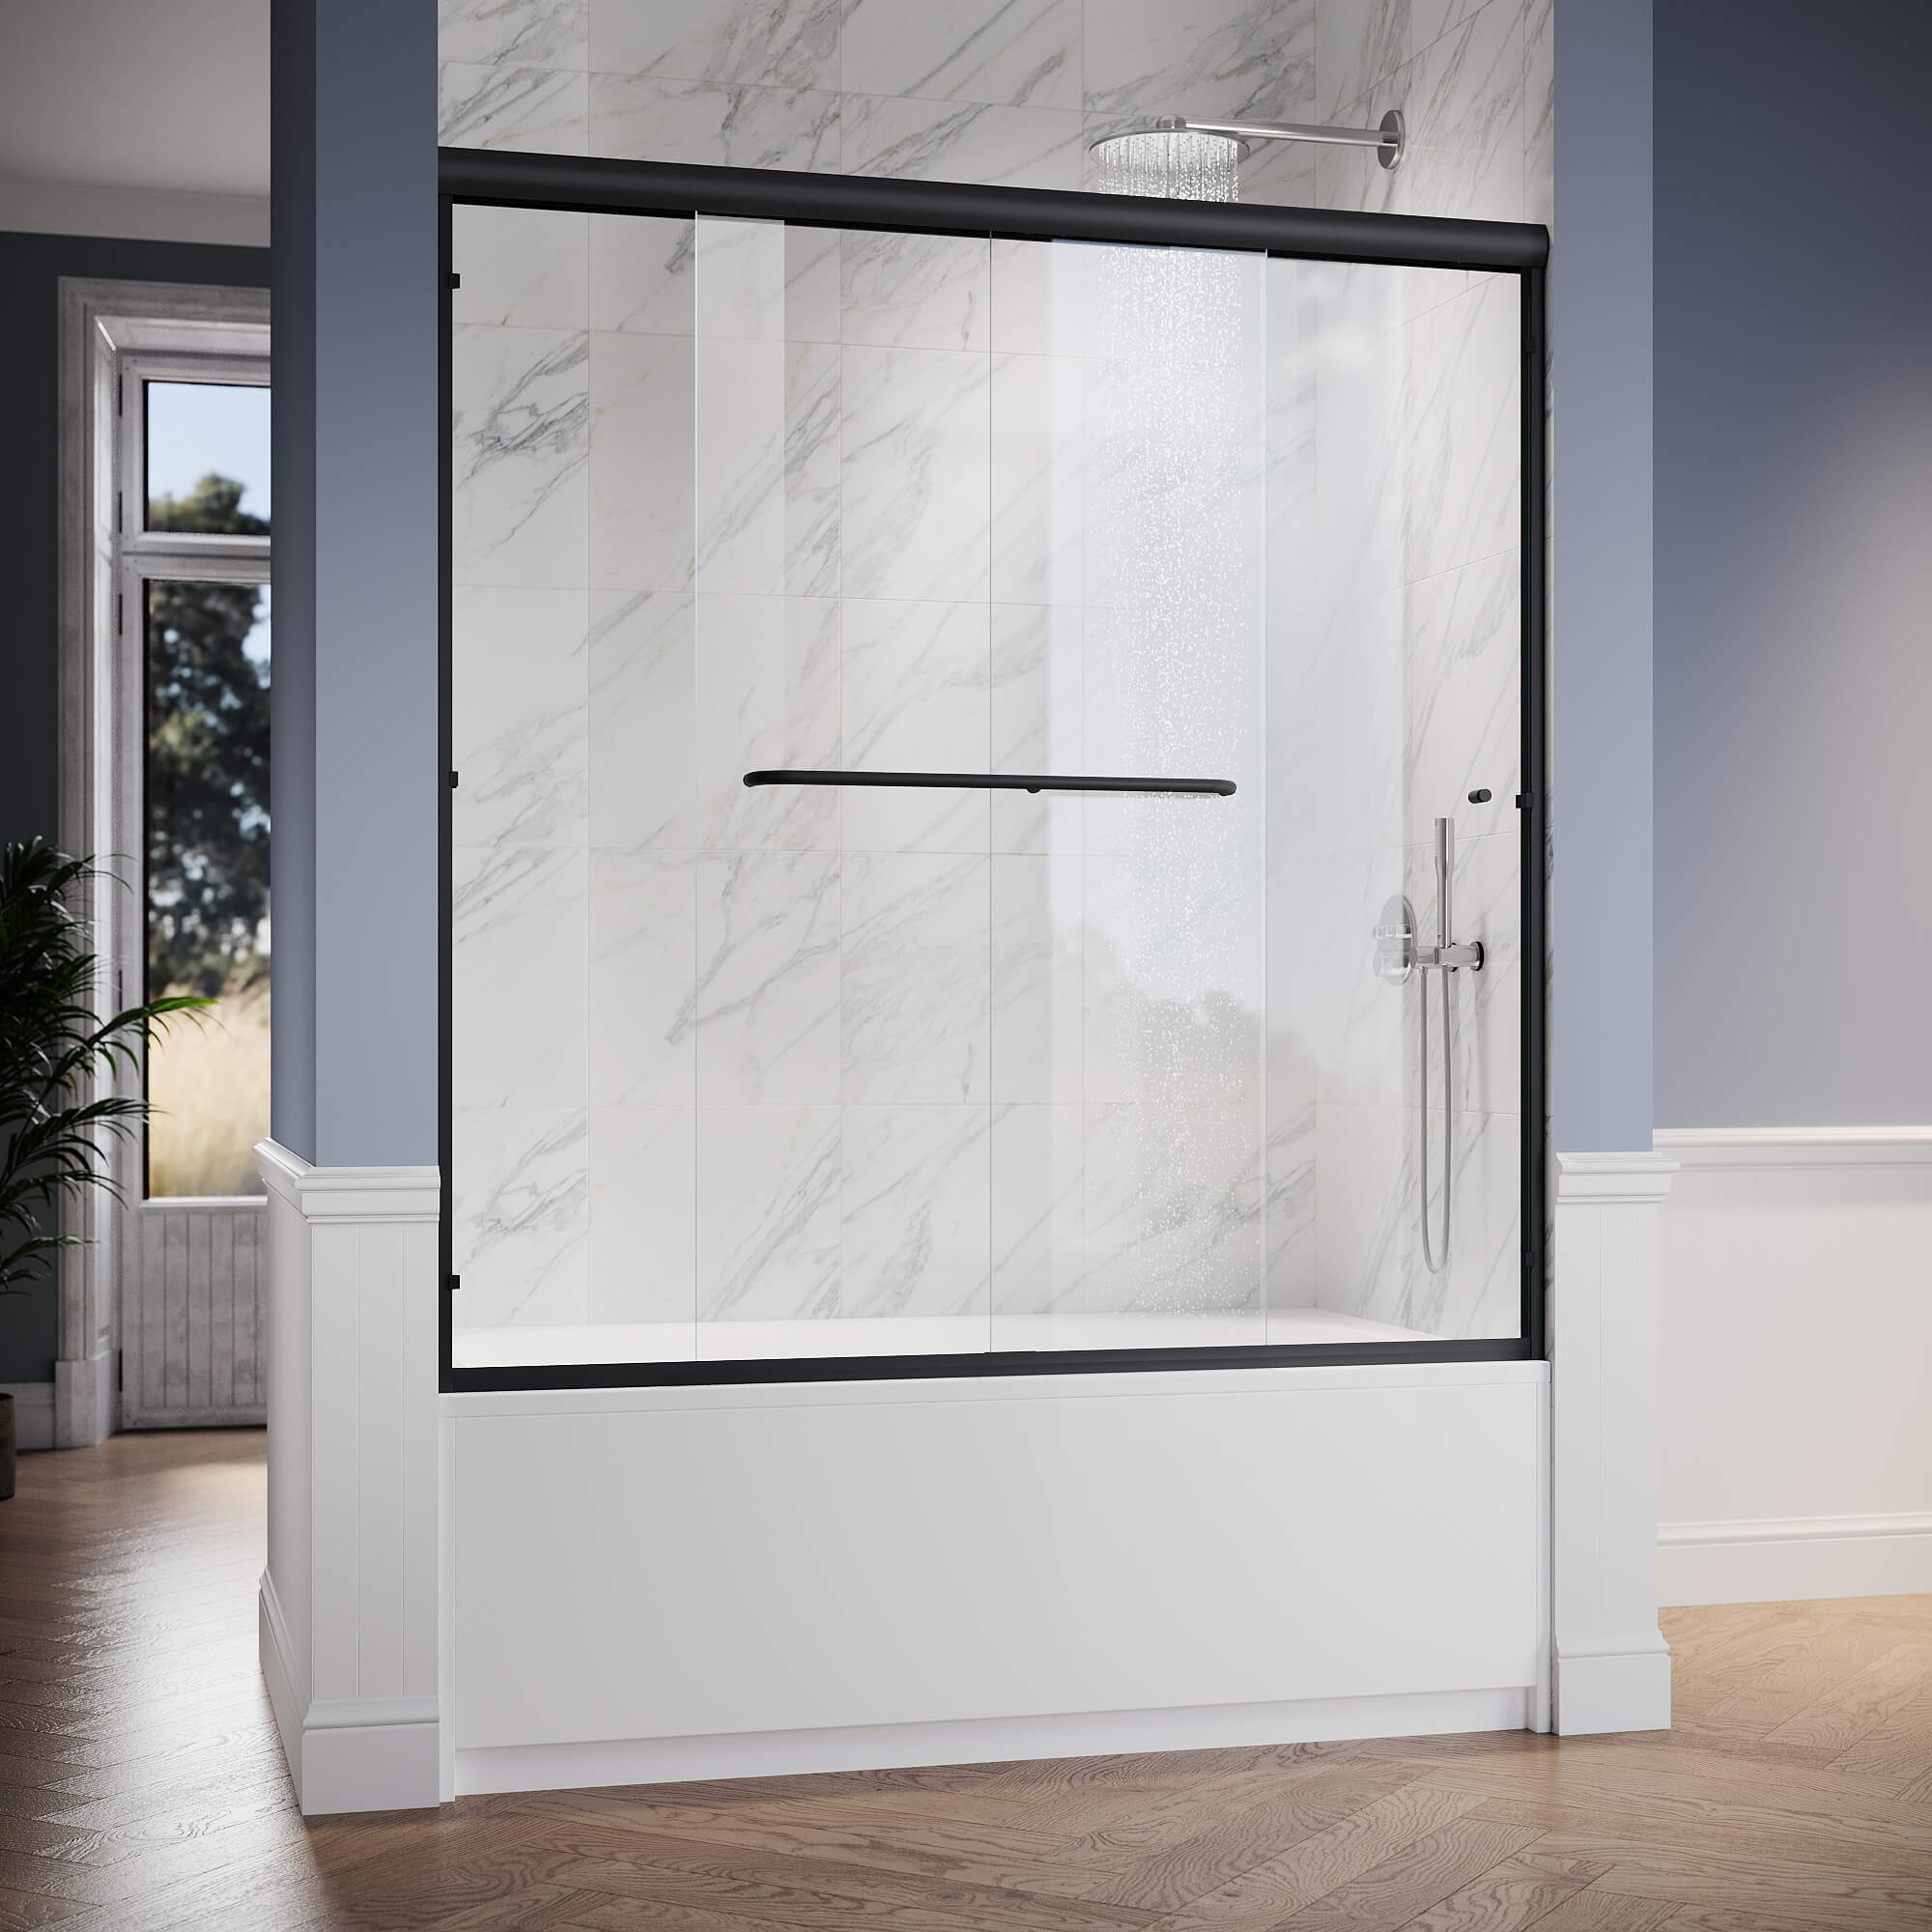
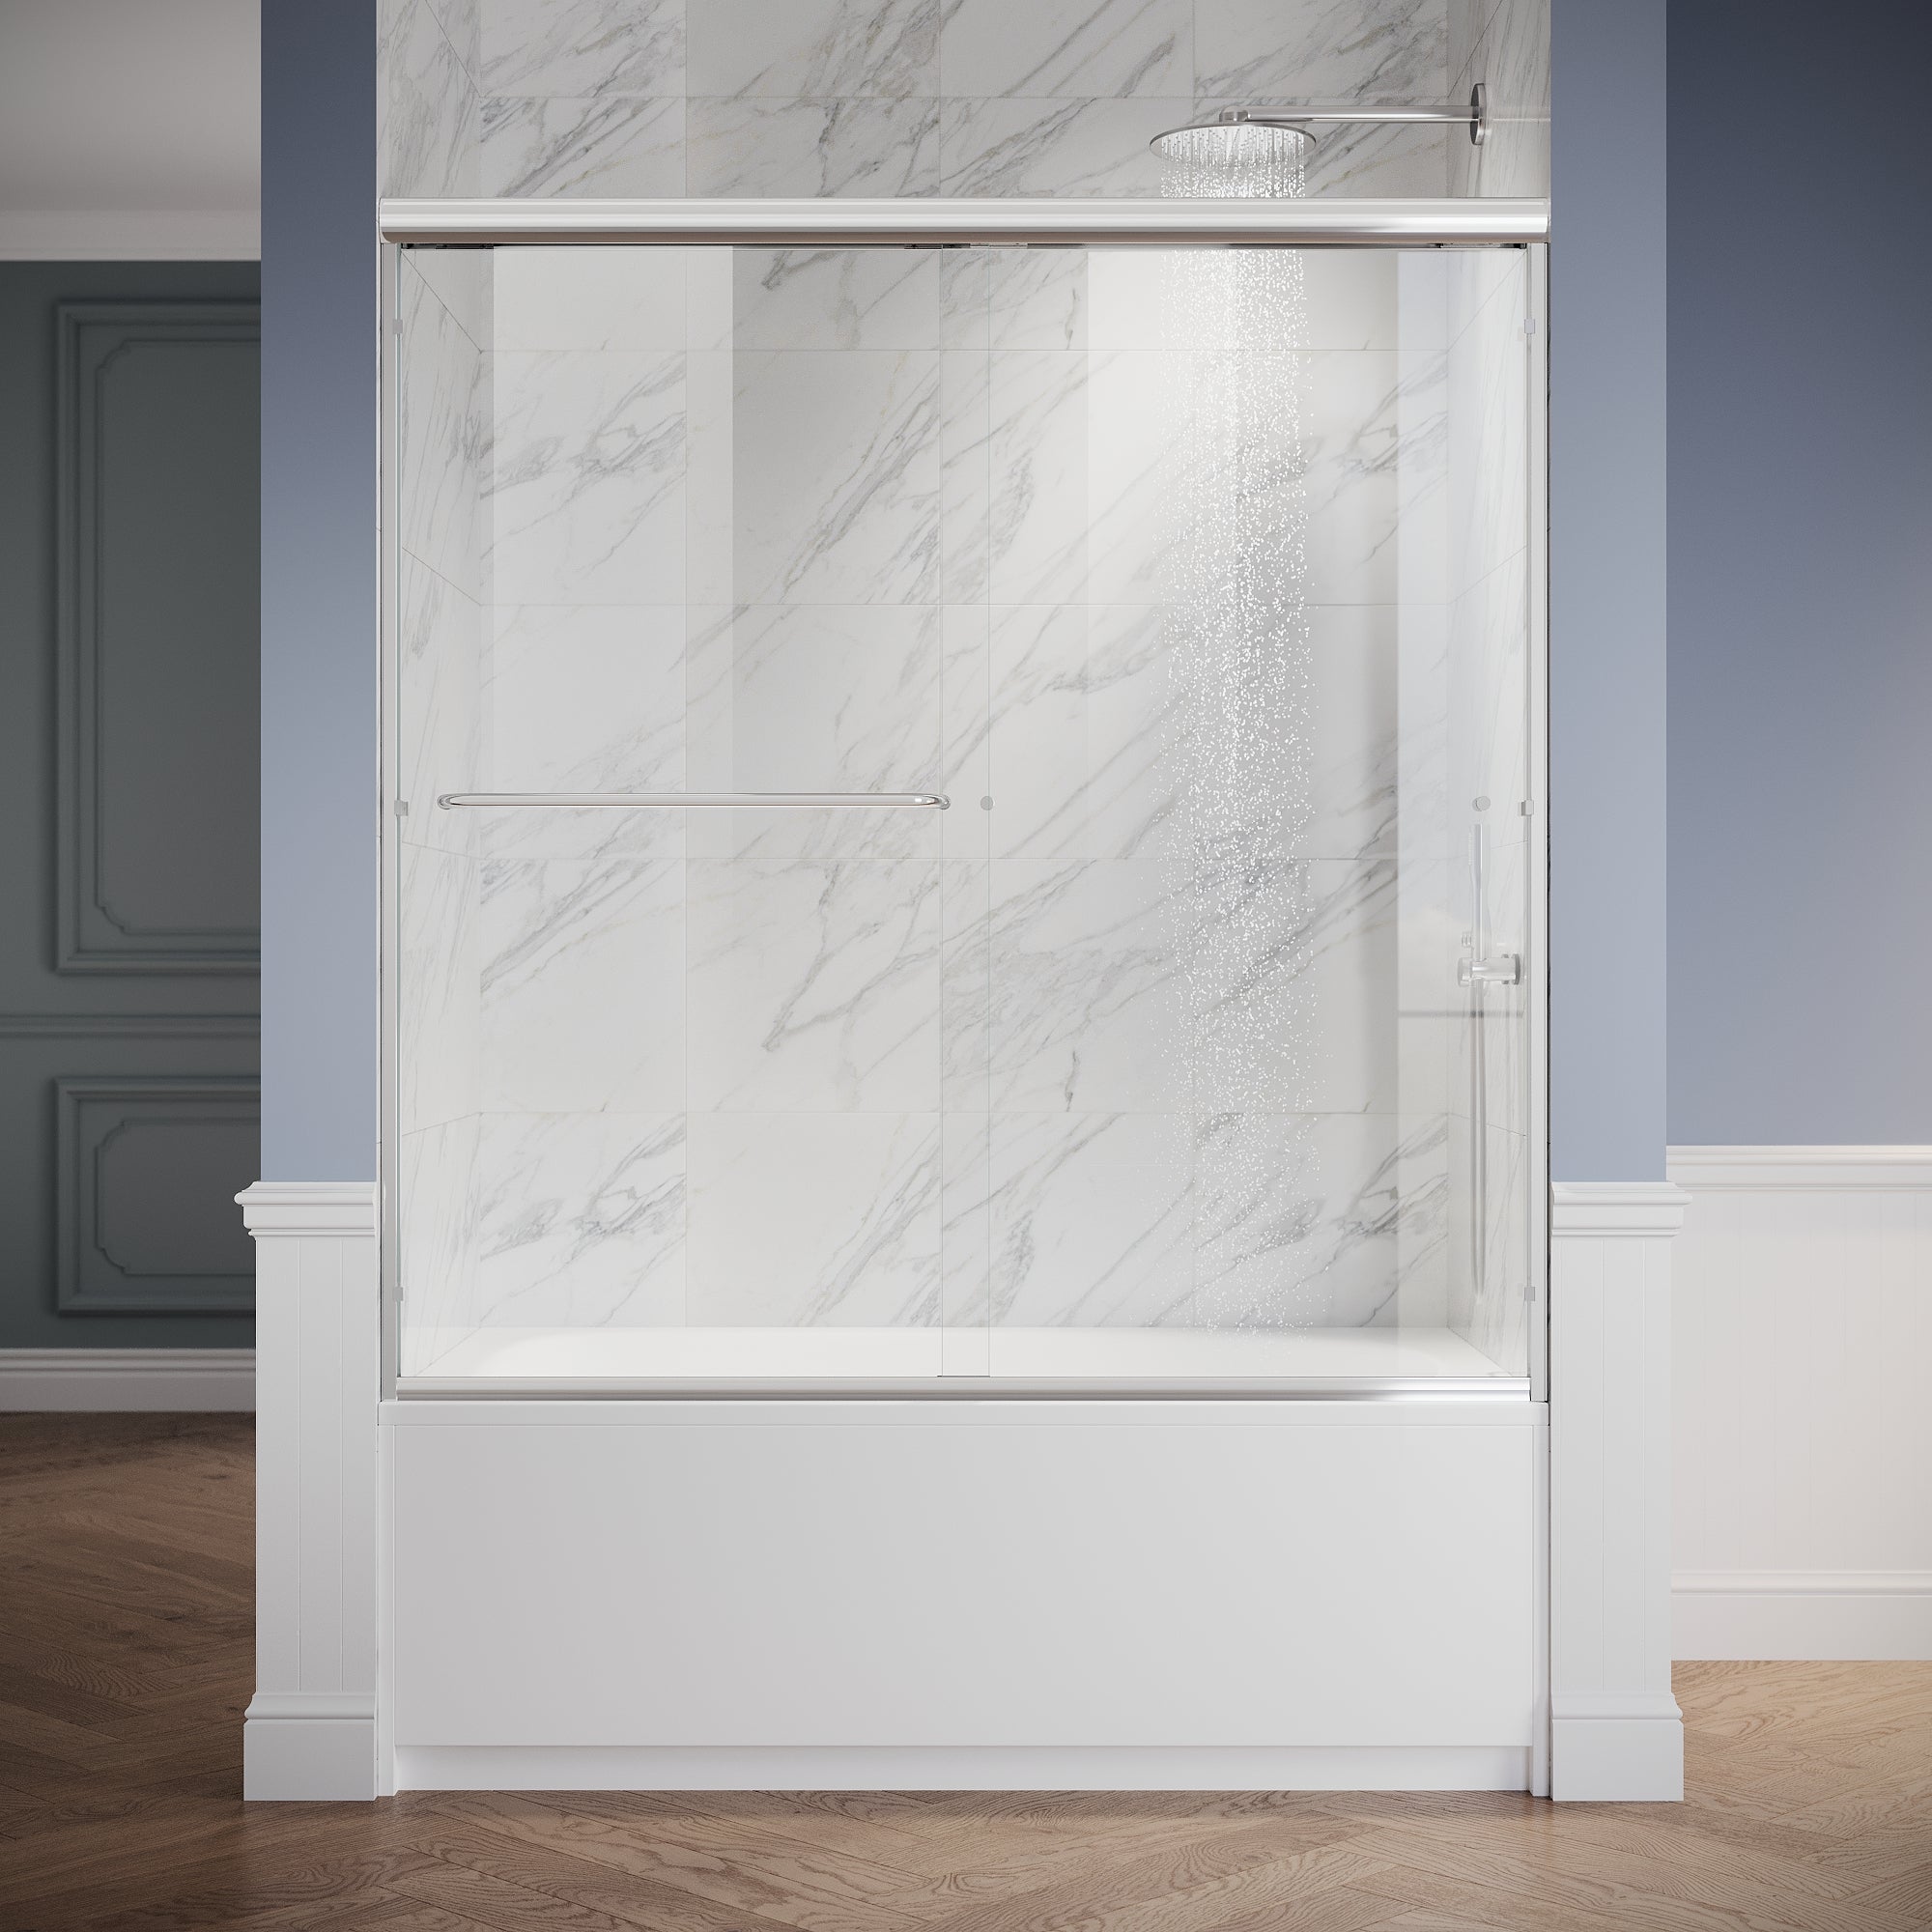
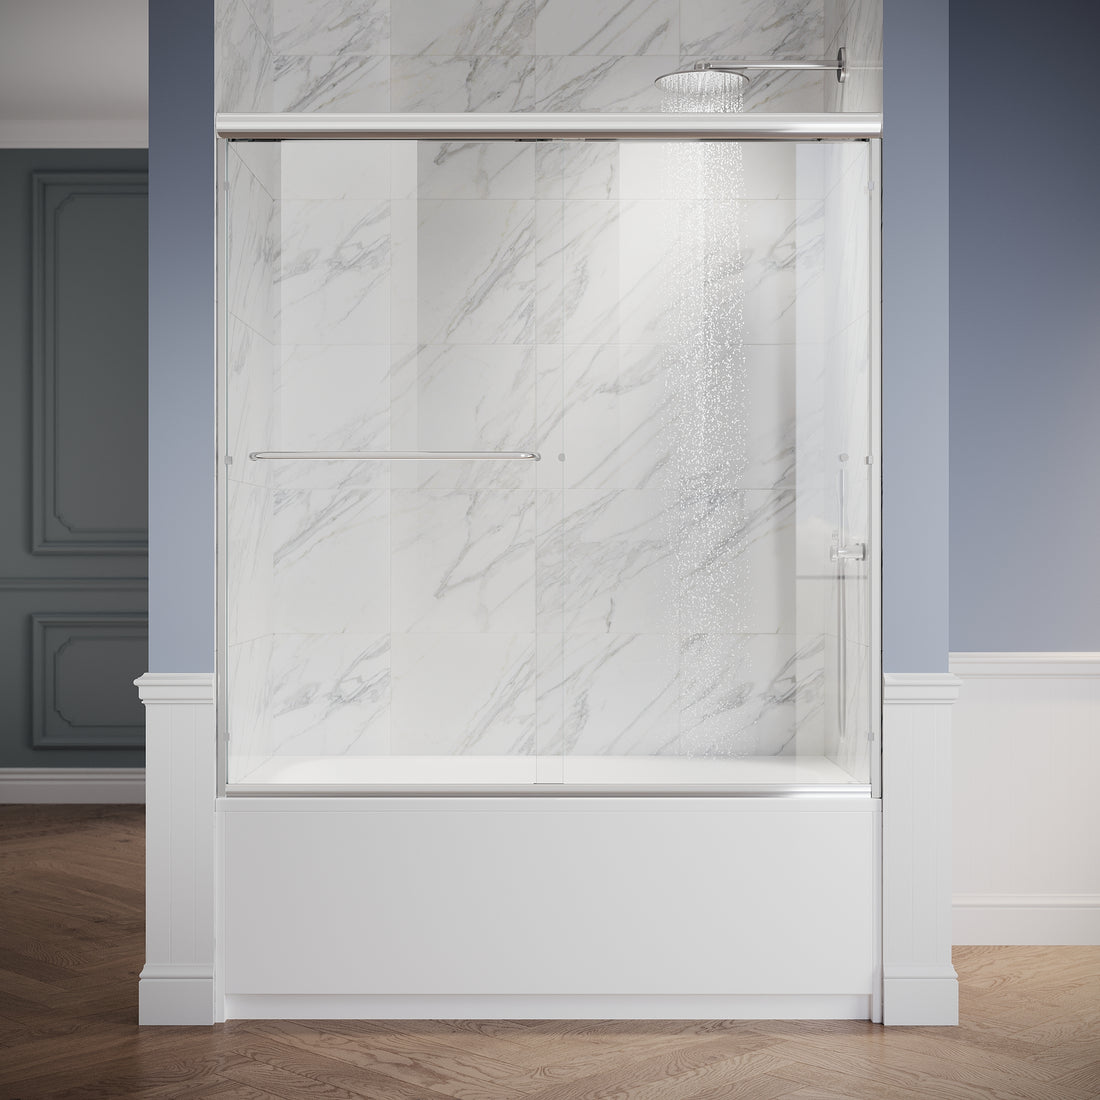
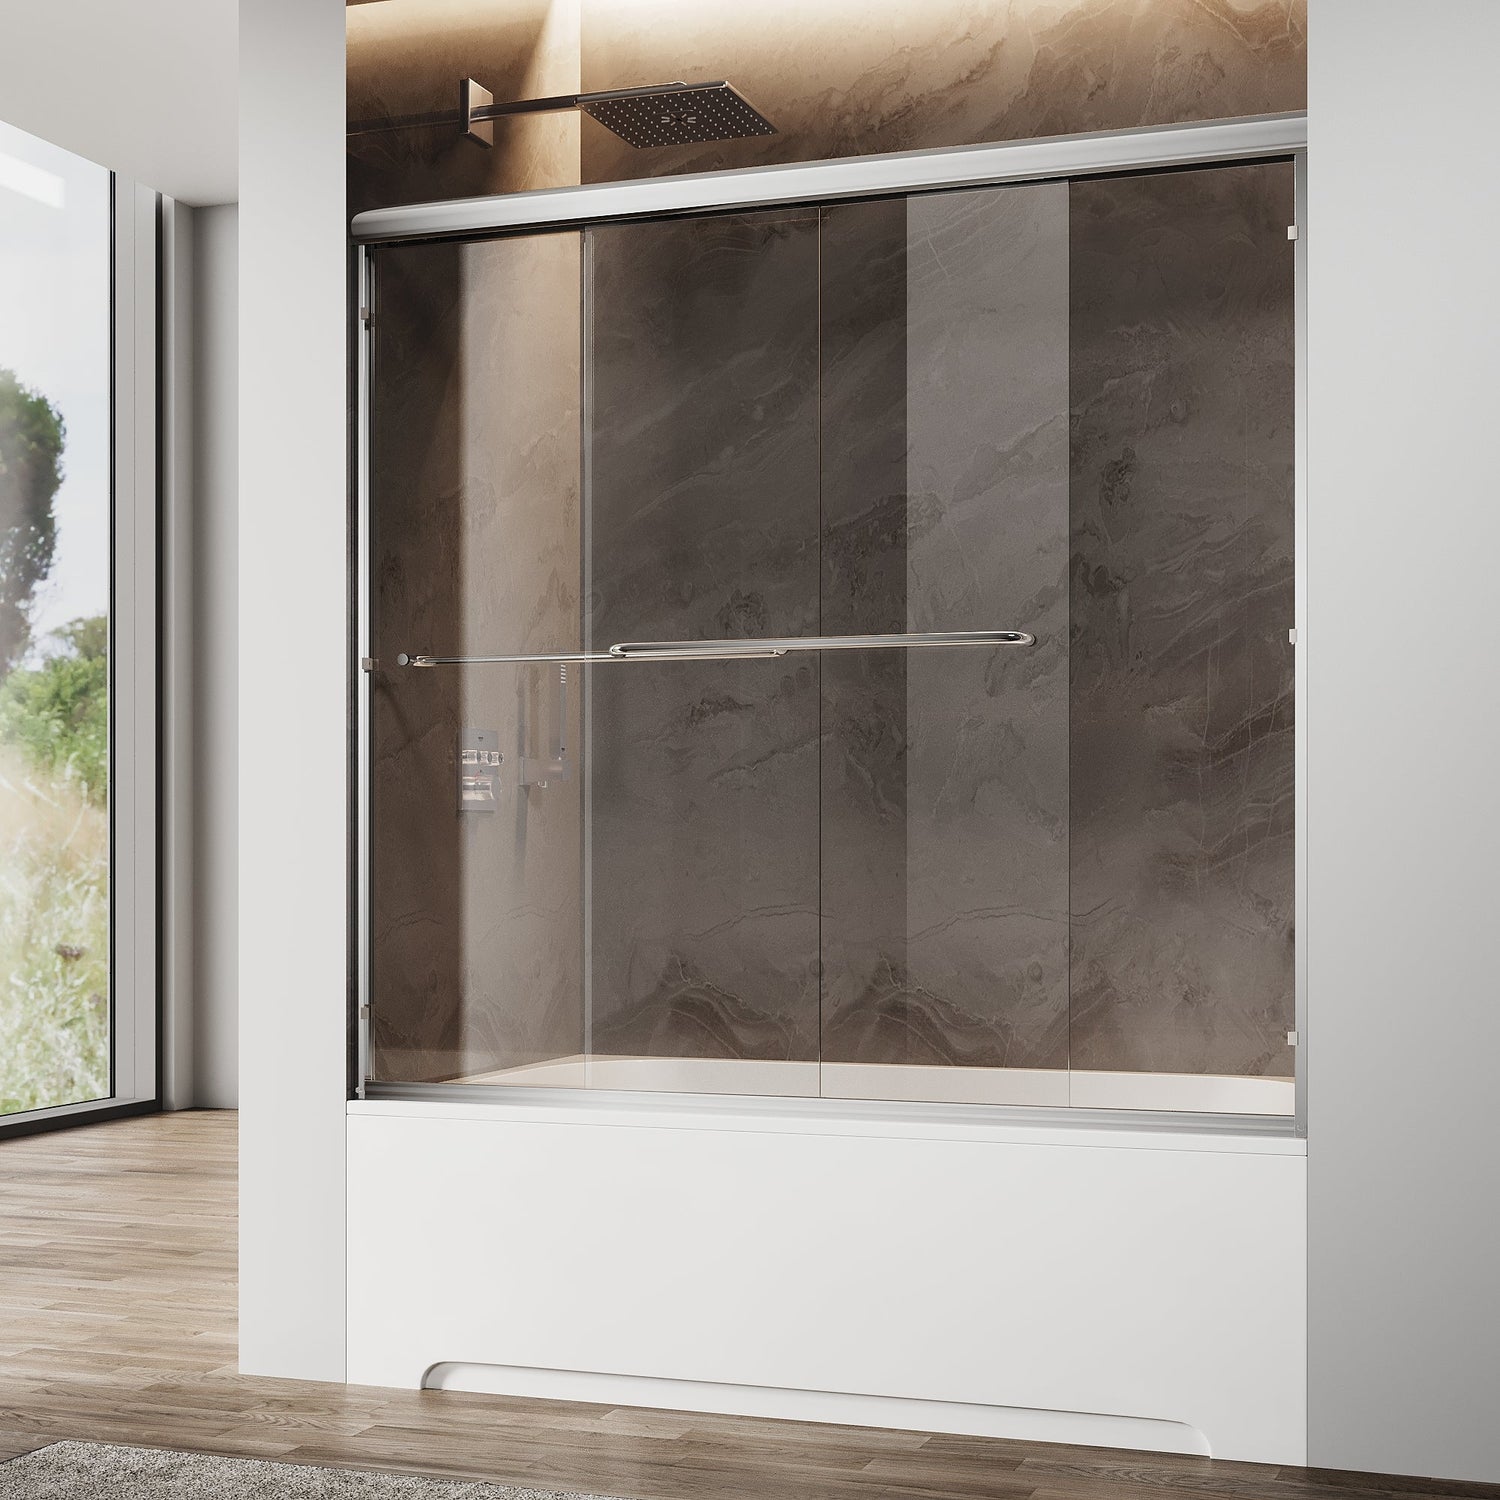
SUNNY SHOWER 1/4 inch Bathtub Shower Door & Double Sliding Door for tub, Black Finish / Brushed Nickel Finish / Chrome Finish
Choose your option
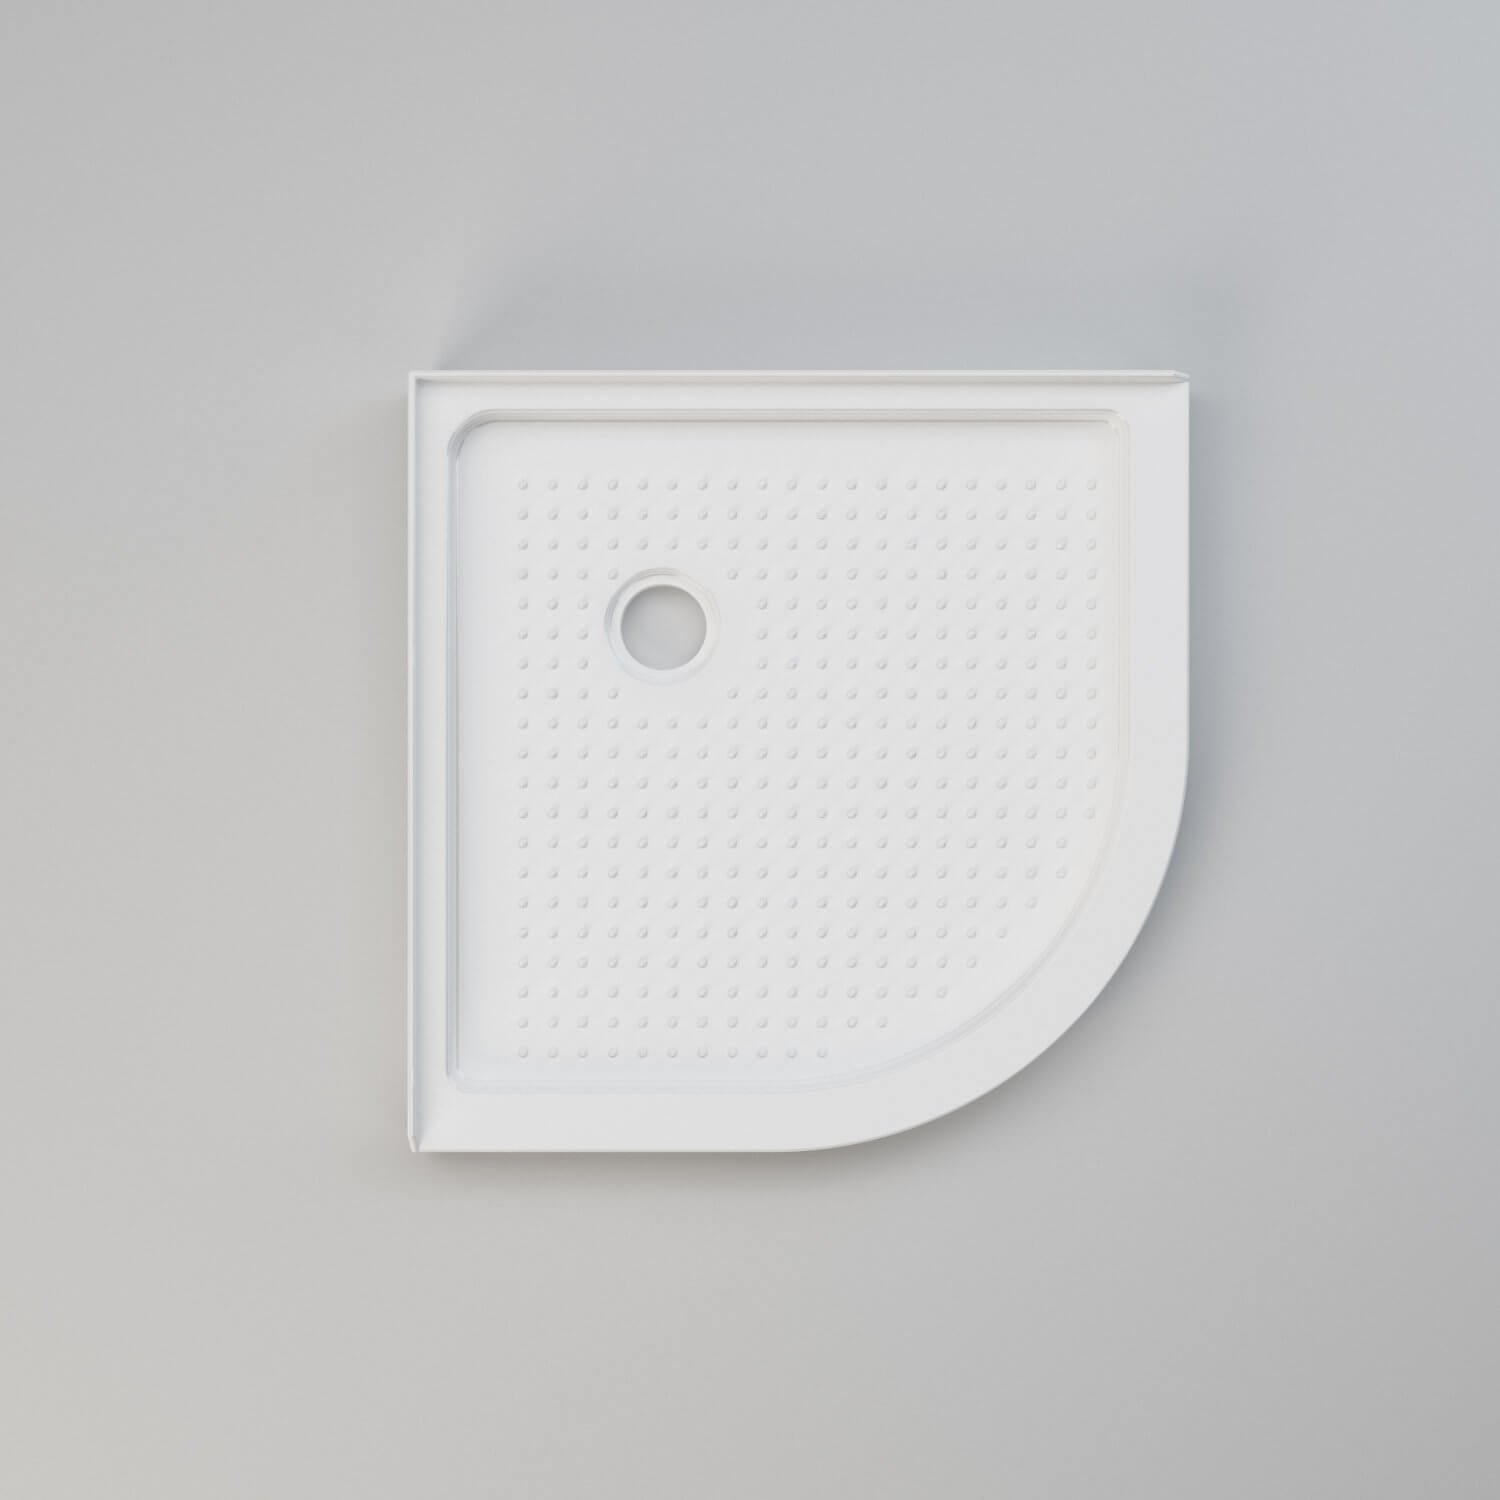
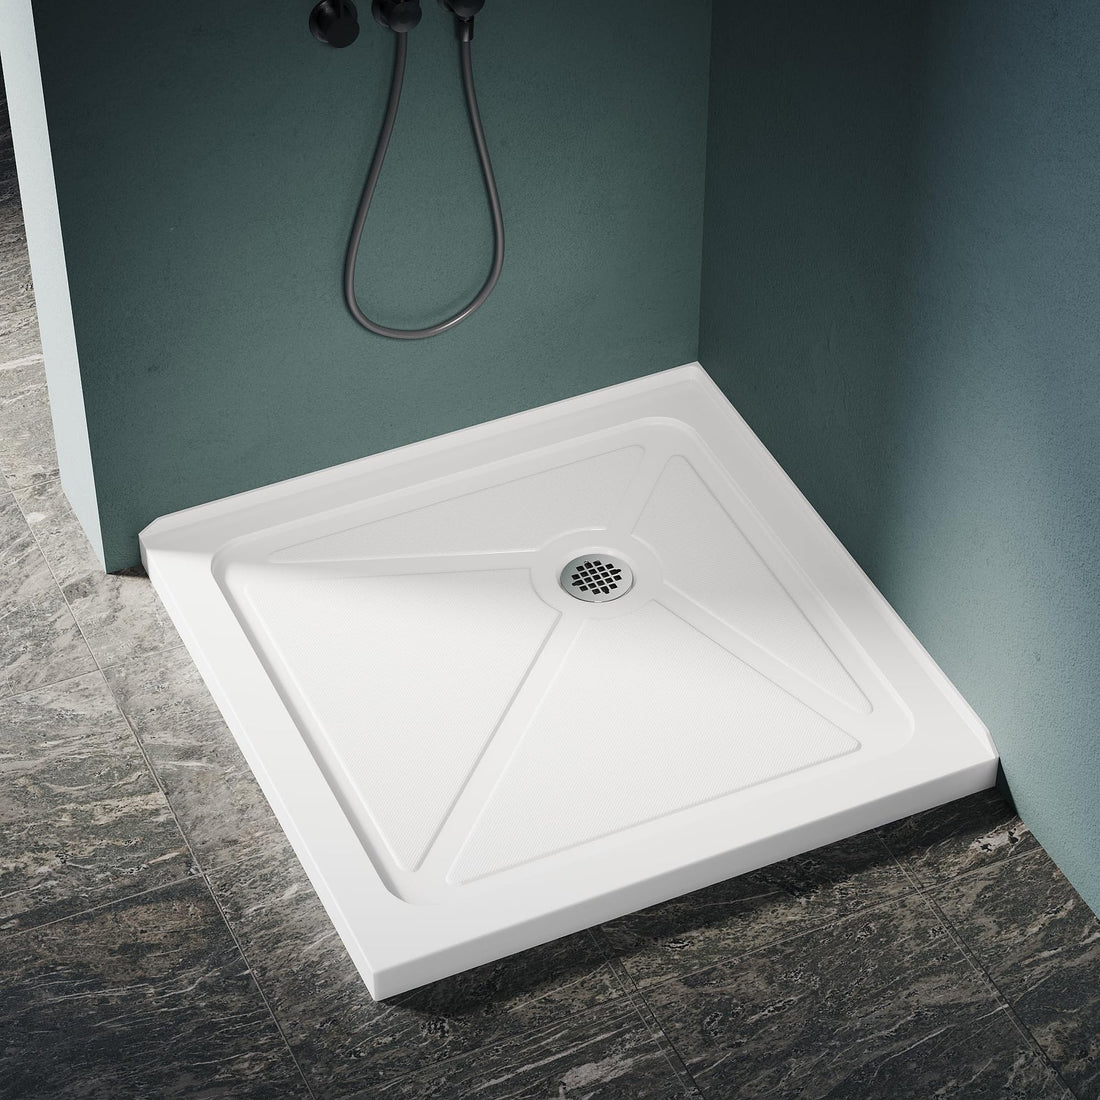
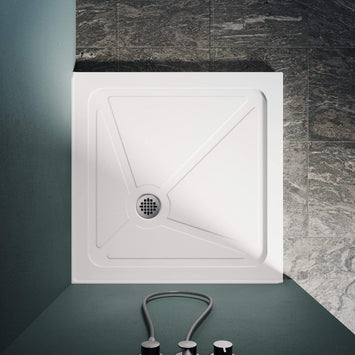
SUNNY SHOWER 38 in. W x 38 in. D x 3 in. H White Corner Drain Quadrant Base
Choose your option

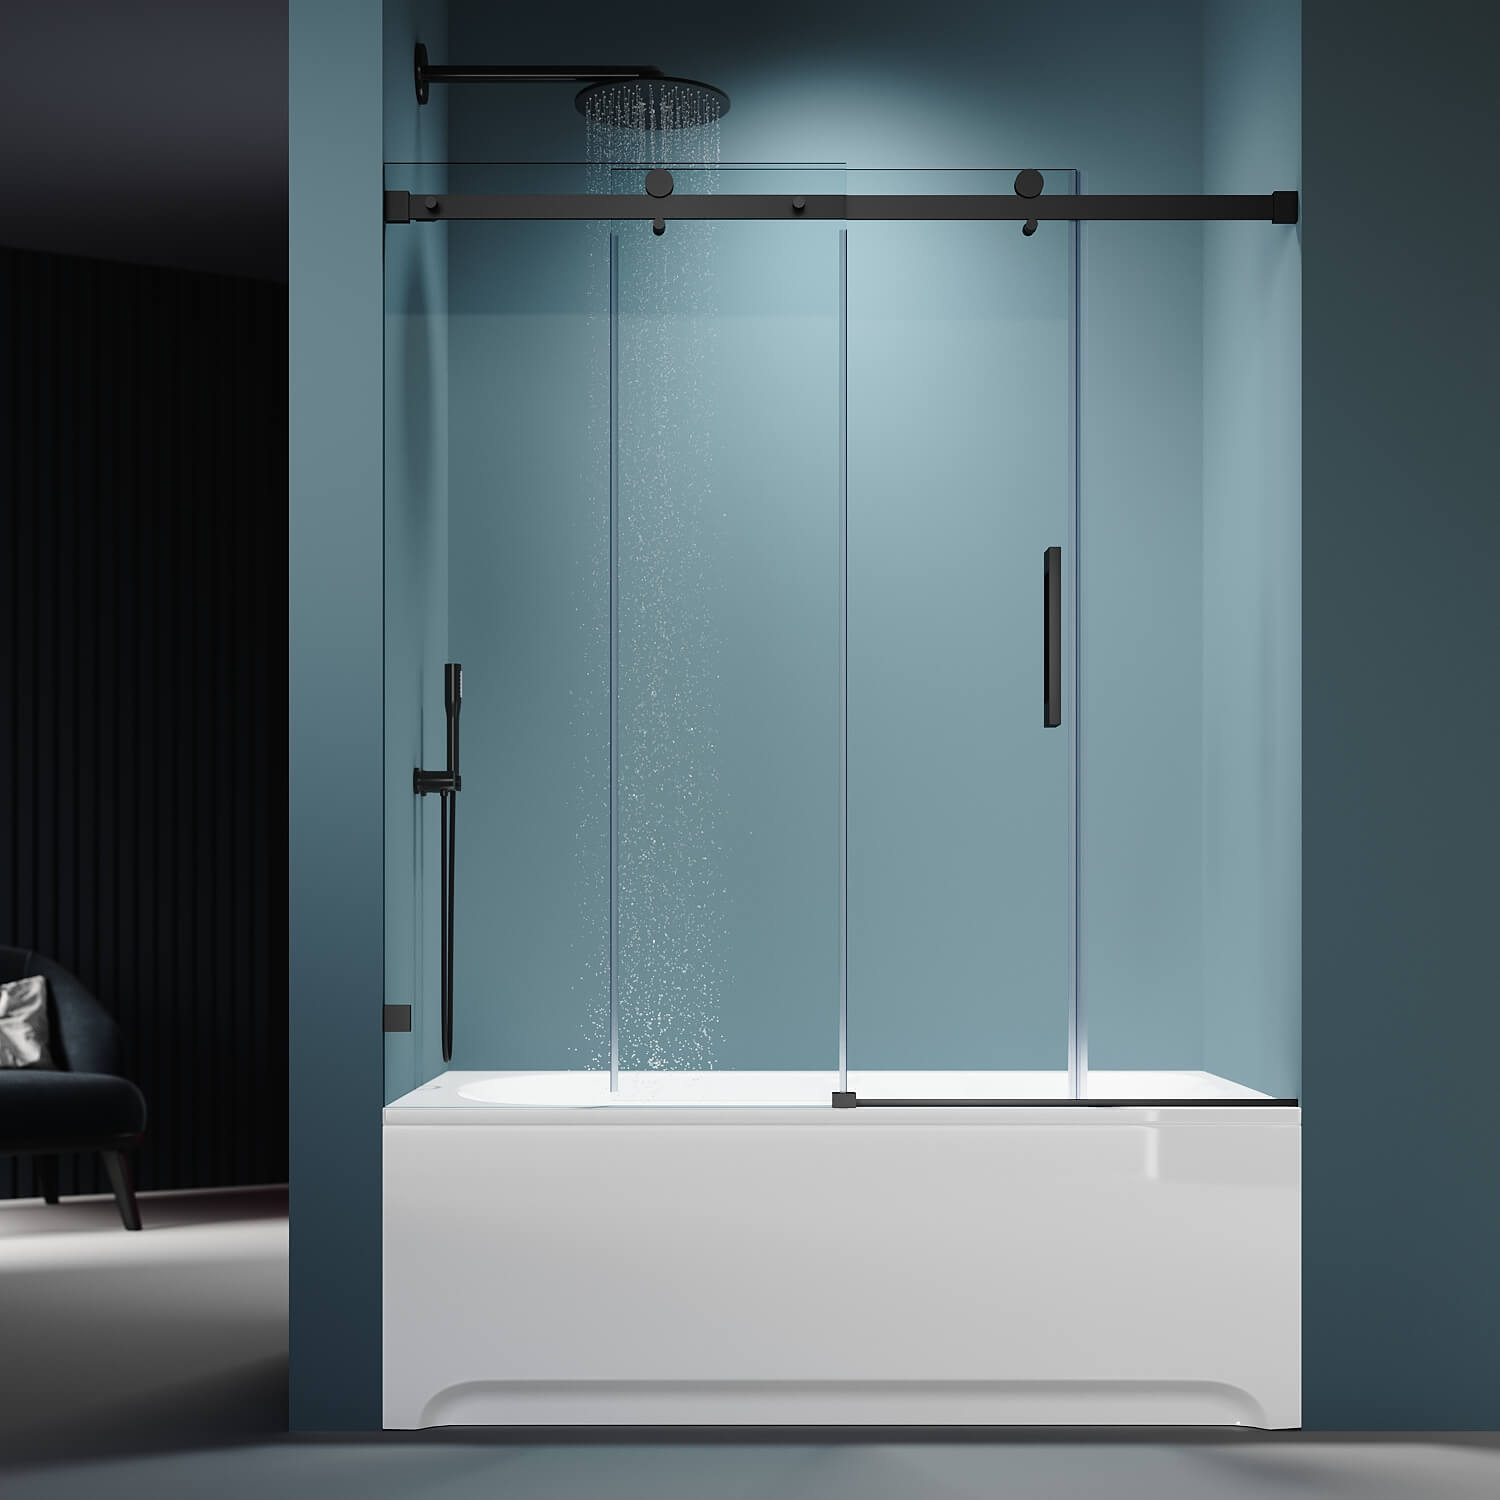
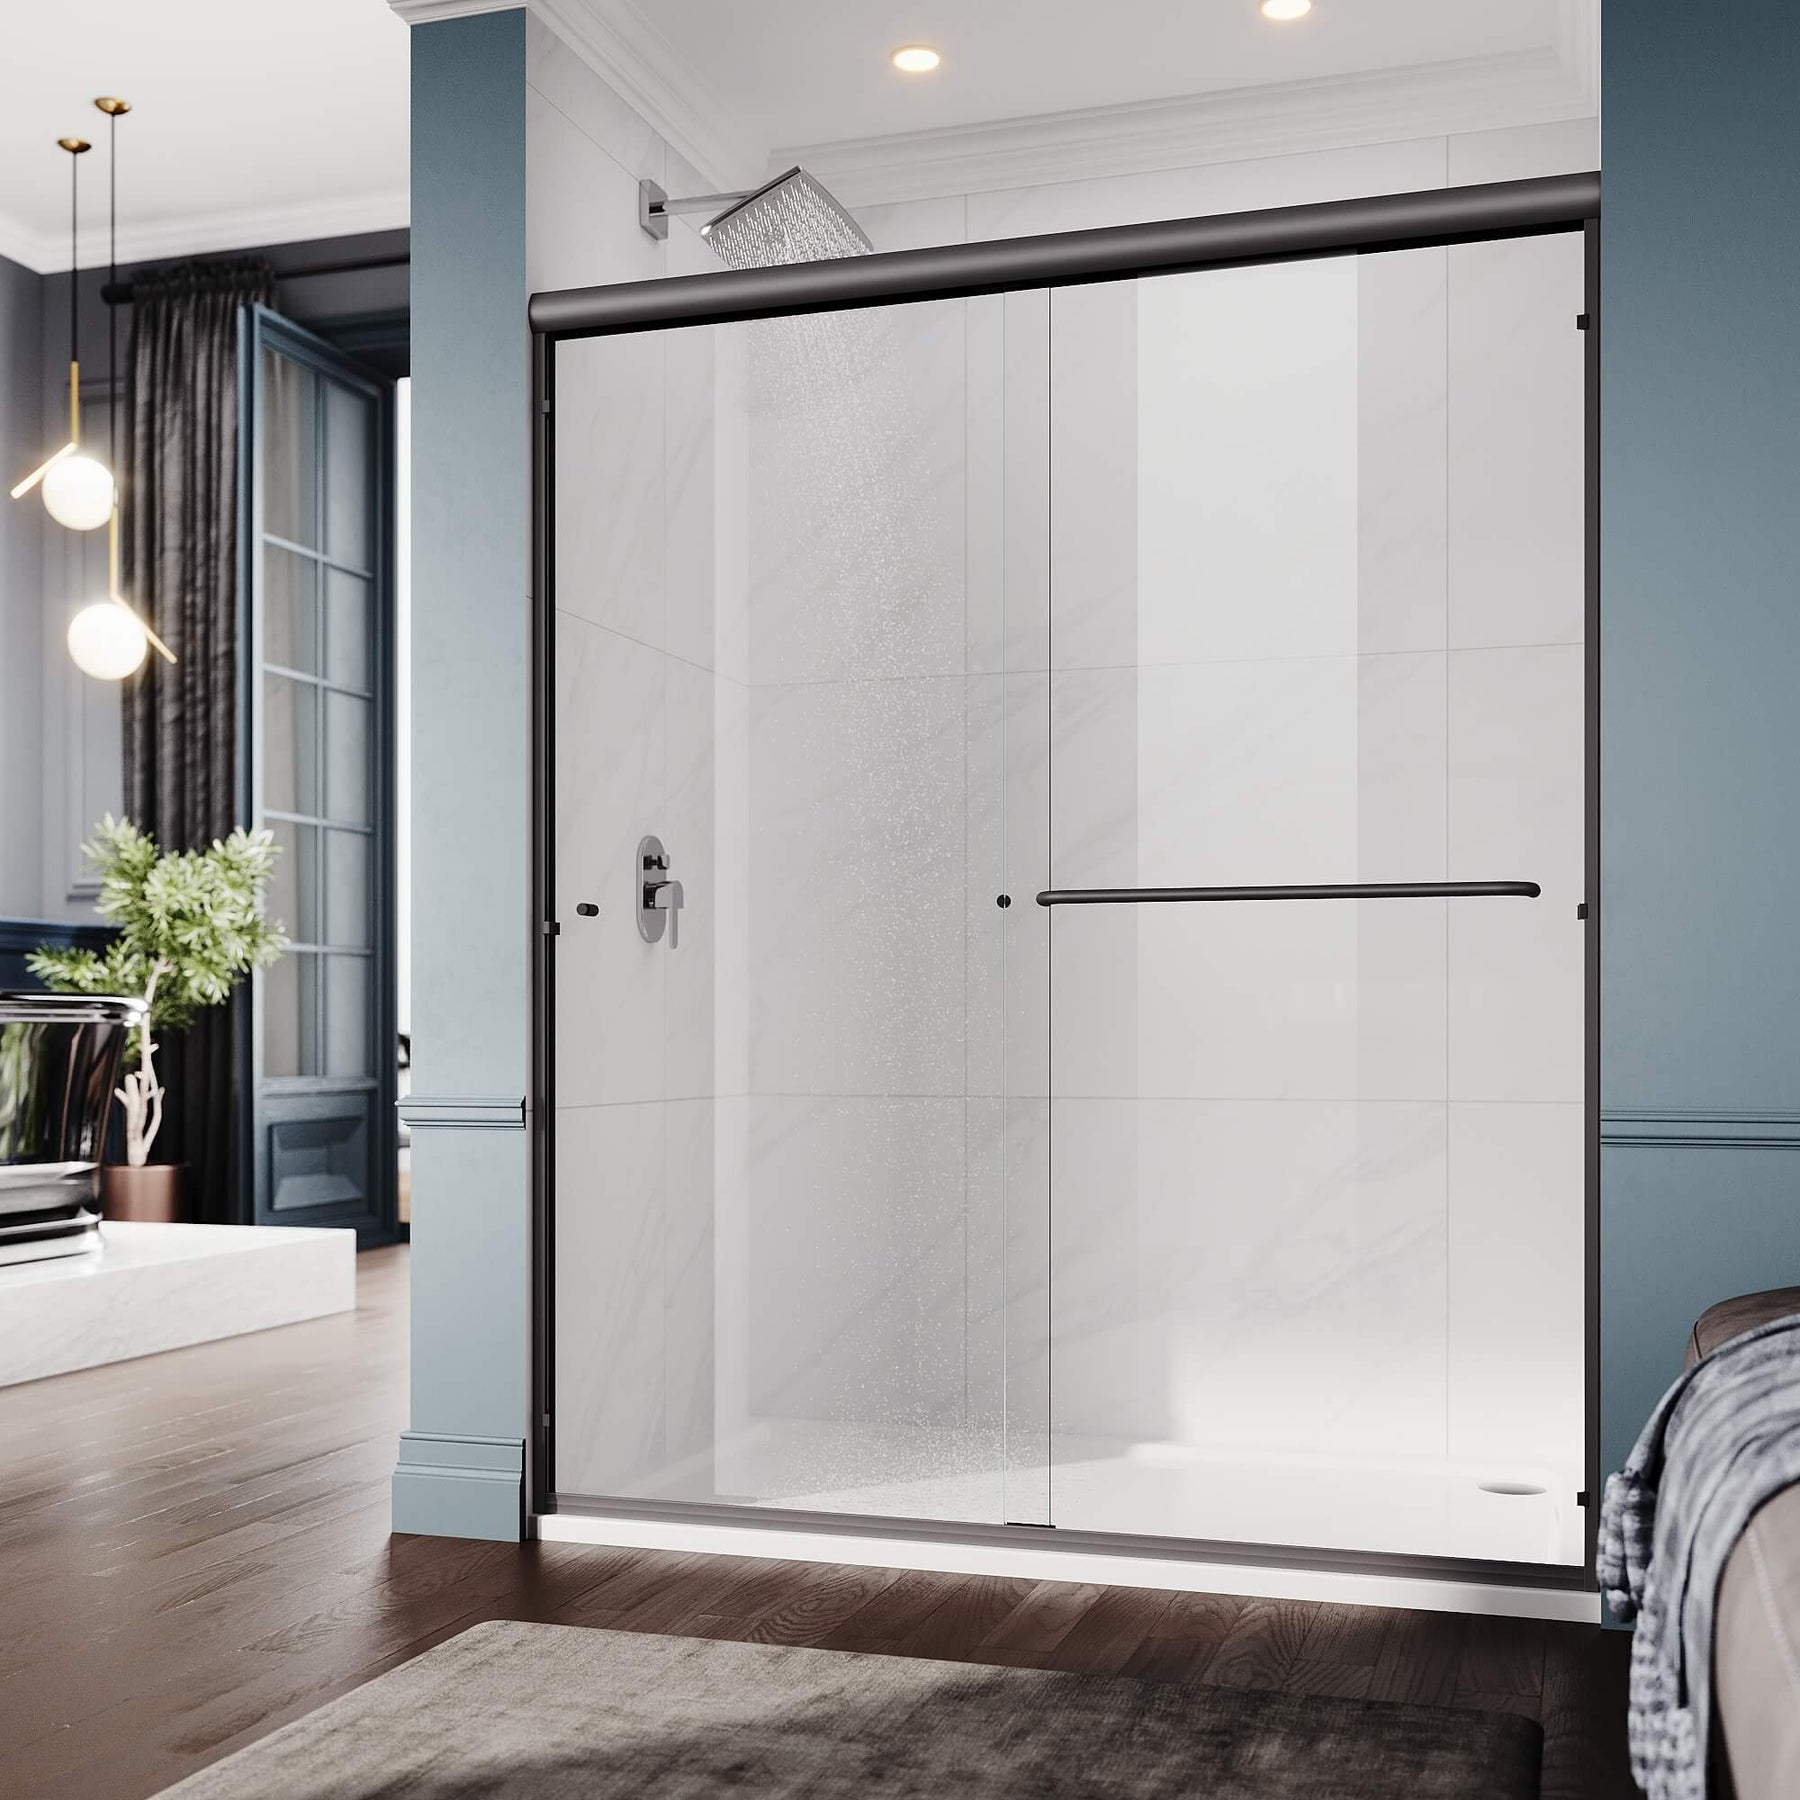
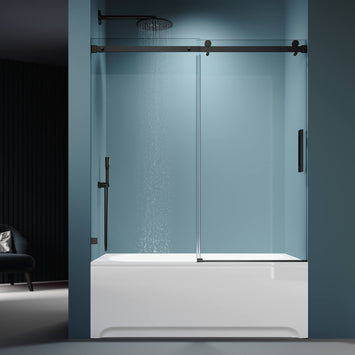
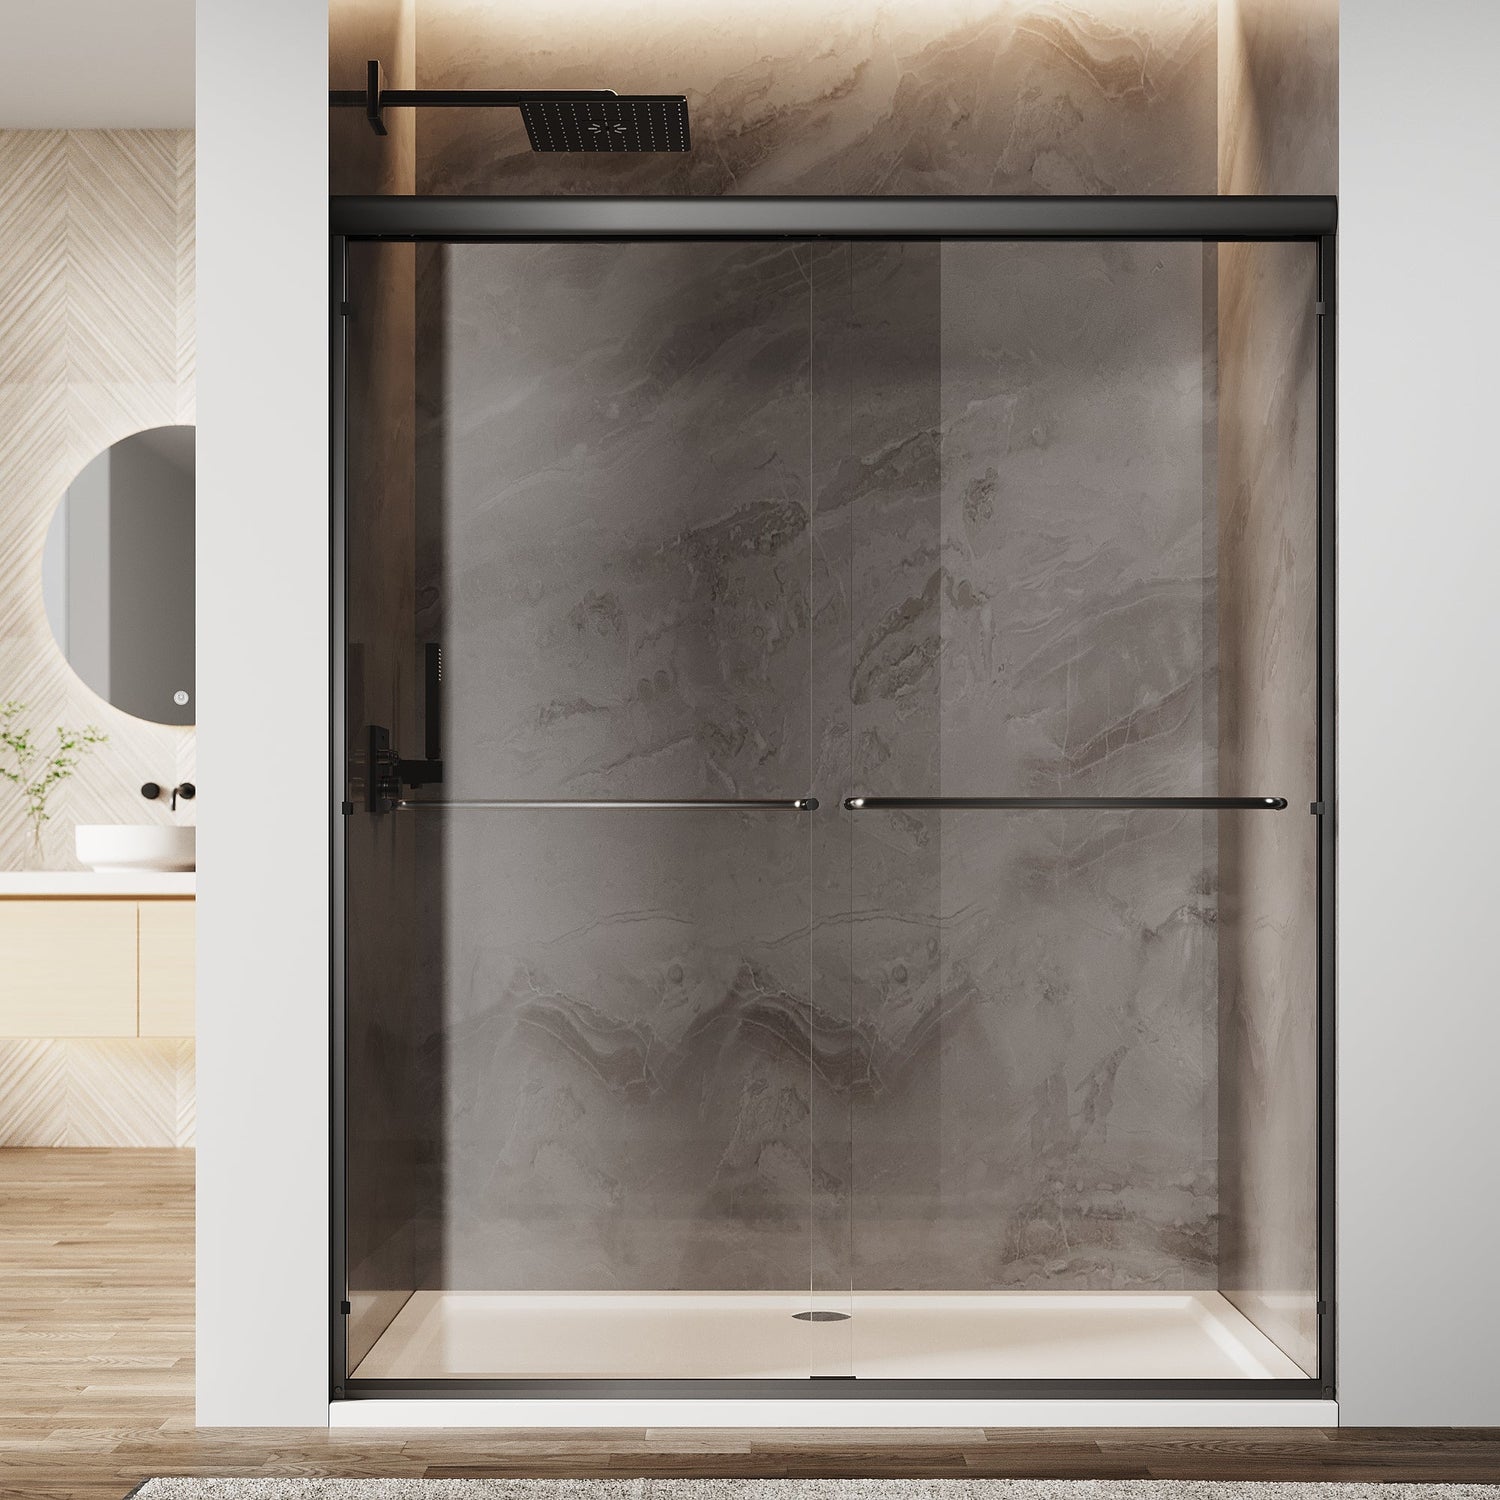
SUNNY SHOWER 60" x 62" Bathtub Shower Door & Frameless Sliding Door for tub, Black Finish / Brushed Nickel Finish
Choose your option
SUNNY SHOWER 1/4 inch Double Sliding Shower Doors, Black Finish / Brushed Nickel Finish / Chrome Finish / Gold Finish
Choose your option
SUNNY SHOWER Corner Square Shower Enclosure with 1/4 in. Clear Tempered Glass Double Sliding Shower Doors, Black Brushed Nickel
Choose your option
SUNNY SHOWER 1/4 inch Bifold Shower Door with Semi-Frameless Clear Tempered Glass, Black Finish / Chrome Finish
Choose your option

SUNNY SHOWER Corner Square Shower Enclosure with 1/4 in. Clear Tempered Glass Double Sliding Shower Doors, Brushed Nickel Finish
Choose your option
SUNNY SHOWER Corner Round Shower Enclosure with 36.7 in. W x 36.7 in. D x 72 in. H Double Sliding Doors, Black Finish / Chrome Finish
Choose your option


WHO ARE WE?
Sunny Showers has been dedicated to providing high-quality bathroom products to our customers, all at affordable prices.
As one of the USA’s leading online bathroom retailers, we offer a range of bathroom products including shower enclosures and shower doors, bathtub doors, shower base.
12353 Rush St, South El Monte, CA
We provide a competitive price to ensure you get the best deal for your ideal bathrooms.
With a global presence, we proudly serve customers internationally, with offices located in USA,AU, UK, DE and FR.
HOW CAN WE HELP YOU?

HOW TO MEASURE GUIDE
Avoid returns and headaches - we'll show you how to get the right measurements for your glass shower door... the first time.

SAFETY & INSTALLATION
How do you choose a high-quality glass door that's safe for your family? Let's get a few things clear.
Customer Reviews
Real feedback from homeowners who upgraded their bathroom with SunnyShower. Trusted quality. Proven performance.
Bathroom Inspiration & Guides
From cleaning tips to installation ideas, explore simple ways to refresh your bathroom and enjoy a clearer, cleaner shower experience.
Can You Install a Shower Door on a Clawfoot or Freestanding Tub? (Options Explained)
The timeless elegance of a clawfoot tub or the sleek silhouette of a modern freestanding tub can be the centerpiece of any bathroom. These statement pieces evoke a sense of luxury and relaxation, hearkening back to a bygone era or defining a contemporary spa-like retreat. But for many homeowners, a crucial question arises, blending practicality with aesthetics: Can you install a shower door on a clawfoot tub? The desire for a quick, contained shower often clashes with the tub's standalone nature. The short answer is yes, but it's not a simple, one-size-fits-all project. Transforming your beautiful soaking tub into a fully functional shower involves navigating unique challenges and making a fundamental choice between two distinct paths: the classic charm of a curved shower rod and curtain or the modern, sleek appeal of a custom glass enclosure. This comprehensive guide will explore both shower door installation options for your freestanding tub, diving deep into the pros, cons, costs, and critical challenges. By the end, you'll have all the information needed to make the right decision for your home, budget, and style. Understanding Your Tub: Clawfoot vs. Freestanding Tub Basics Before we delve into shower door installation, it's essential to understand the canvas we're working with. While the terms are often used interchangeably, there's a subtle distinction. A clawfoot tub is a specific type of freestanding bathtub characterized by its iconic elevated feet, often shaped like animal claws or ball-and-claw designs. These are typically vintage or vintage-style cast-iron tubs, prized for their classic aesthetic. A freestanding tub is a broader category that includes clawfoot tubs but also encompasses modern designs like pedestal tubs (which rest on a solid base), soaking tubs with smooth, flat bottoms, and sculptural acrylic tubs. The common thread? They are not attached to any walls on their sides. This very feature—the lack of adjacent walls—is the central challenge and the reason why adding a shower door for a freestanding tub is a specialized endeavor. Shower Door Installation on a Clawfoot Tub: Is It Possible? So, can you technically install a shower door on a clawfoot tub? Absolutely. However, this is not a standard, off-the-shelf project you'd find for a built-in tub-shower combo. The primary hurdle is creating a structurally sound and water-tight enclosure without the benefit of pre-existing walls on three sides. This requires careful planning around two core needs: Structural Support: A glass panel needs to be securely anchored, either to the floor, the ceiling, or a combination of both. Water Containment: Without a built-in shower pan, the entire system must be designed to direct all water back into the tub and protect your bathroom floor from moisture damage. The solutions to these challenges boil down to two main approaches, which we will explore in detail. Option 1: The Curved Shower Rod and Curtain Solution For most owners of vintage-style tubs, the curved shower rod for a clawfoot tub is the go-to solution. It's the traditional and most common way to add shower functionality. Installing a Curved Shower Rod on Your Clawfoot Tub This system involves a U-shaped or oval-shaped rod that arcs over the tub, providing a curtain track that maximizes interior space. Installing a clawfoot tub shower curtain is a relatively straightforward process that can often be handled as a DIY project. Pros of a Clawfoot Tub Shower Curtain: Cost-Effective: This is by far the most budget-friendly option. A quality curved rod and a liner/curtain set will cost a fraction of a custom glass enclosure. Preserves Vintage Aesthetic: For a historic home or a strictly traditional bathroom, a curtain is period-appropriate and enhances the classic look of a clawfoot tub. Easy Installation: Most systems are designed for DIY installation with basic tools, involving mounting brackets to the wall or, in some cases, the ceiling. Safety and Softness: A fabric curtain is soft and pliable, eliminating the risk of hard impacts against glass, which is a consideration in smaller bathrooms. Cons of a Clawfoot Tub Shower Curtain: Water Containment Issues: Even the best curtains can allow water to splash onto the floor. The curtain can also cling to the user, exacerbating the problem. Less Luxurious Feel: While beautiful, a curtain doesn't offer the same high-end, spa-like experience as a glass door. Maintenance: Fabric curtains and plastic liners are prone to mildew and need regular cleaning and replacement. Installation Considerations: You'll need to choose between a wall-mounted rod or a more dramatic ceiling-mounted rod. Precise measurement of your tub's length and width is crucial to ensure the rod fits perfectly and the curtain adequately surrounds the tub. Option 2: The Custom Glass Shower Door Enclosure For those seeking a contemporary, minimalist look and superior functionality, a custom glass shower door is the ultimate solution. This approach transforms your freestanding tub into a stunning, walk-in shower experience. Installing a Glass Shower Door on a Freestanding Tub This process involves a professional glass company fabricating tempered glass panels specifically for your tub and bathroom layout. The glass shower door installation is complex and should always be handled by experienced professionals. Types of Glass Enclosures for Freestanding Tubs: Single Panel Shower Screen: A single fixed panel of glass, typically placed at the head of the tub where the showerhead is. This is a minimal option that offers some splash protection but is not a full enclosure. Partial Enclosure: Two glass panels that meet at a corner, often using the existing bathroom walls to form a three-sided shield. This offers better containment than a single panel. Full Shower Door Enclosure: A multi-panel system that includes a door for entry. This is the most effective at containing water and creates a dedicated "shower room" around your tub. Pros of a Custom Glass Shower Door: Superior Water Containment: When properly installed, a glass enclosure effectively keeps all water inside the bathing area, protecting your floors and walls. Modern, Open Aesthetic: Frameless glass creates a clean, open, and luxurious look. It showcases the tub as a piece of art while adding a modern touch. Easy to Clean: Glass is non-porous and, when treated with a water repellent coating, is simple to wipe down and keep spotless. Increases Home Value: The high-end appeal of a custom glass shower door for a freestanding tub is a significant selling point that can boost your home's resale value. Cons of a Custom Glass Shower Door: High Cost: Custom fabrication and professional installation make this the most expensive option by a wide margin. Potential Style Clash: A large glass structure can visually compete with or overwhelm the vintage charm of a traditional clawfoot tub. Complex Installation: This is not a DIY job. It requires precise measurements, potentially complex plumbing adjustments, and expert anchoring to ensure stability and safety. Key Challenges of Installing a Shower Door on a Freestanding Tub Choosing the glass shower door route means confronting several specific freestanding tub shower door installation challenges. Being aware of these hurdles is crucial for planning and budgeting. Water Containment and Flooring Protection: The biggest issue is the lack of a shower pan. All water must be directed into the tub drain. This often requires ensuring the tub is perfectly level and that the flooring around it is waterproofed, sometimes necessitating a tiled curb or a specially designed drain channel in the floor. Plumbing and Showerhead Placement: The plumbing for a freestanding tub shower is exposed. The riser pipe and showerhead must be strategically placed so that the water stream is effectively caught by the enclosure and doesn't spray out through gaps. Structural Support and Stability: A large, heavy piece of glass must be immovably secure. Installers may need to anchor panels directly to the floor joists or ceiling, which can involve significant construction work. The type of floor (concrete vs. wood subfloor) also impacts the anchoring method. Finding the Right Professional: Not every glass company has experience with freestanding tubs. You need to find a specialist who understands the unique structural and water-proofing requirements of this type of project. Cost Analysis: Clawfoot Tub Shower Door vs. Curtain Rod Let's break down the numbers. The cost difference between the two options is dramatic and is often the primary deciding factor for homeowners. Clawfoot Tub Shower Door Cost vs. Curtain Cost This option is renowned for its affordability and accessibility. For many homeowners, it provides the necessary functionality without breaking the bank. Cost of a Curved Shower Rod and Curtain System: Curved Shower Rod: $50 - $200 Curtain & Liner: $20 - $100 Total Estimated Cost (DIY Installation): $70 - $300 This is a highly accessible price point for most budgets, and the installation is straightforward enough to be a weekend DIY project. Cost of a Custom Glass Shower Door Enclosure: This cost is highly variable based on the glass type (thickness, clarity, texture), the complexity of the design, and your geographic location. Materials (Tempered Glass, Hardware): $500 - $1,500+ Professional Installation: $500 - $1,500+ Total Estimated Cost: $1,000 - $3,000+ For a full, multi-panel enclosure with a door, it's not uncommon for costs to reach the higher end of this spectrum or even exceed it. Feature Curtain & Rod Custom Glass Enclosure Cost $70 - $300 $1,000 - $3,000+ Installation DIY-Friendly Professional Required Water Containment Fair Excellent Aesthetic Classic, Vintage Modern, Spa-like Maintenance Moderate (Cleaning/Replacement) Easy (Wipe Down) Making the Decision: Which Shower Door Option is Right for Your Tub? So, how do you choose? Your decision will ultimately hinge on your budget, your desired aesthetic, and your tolerance for potential water splash. Choose a Curtain and Rod if: You are working with a limited budget. You want to preserve the authentic, classic look of your clawfoot tub. You are comfortable with a DIY project. Occasional water splash is not a major concern. Choose a Custom Glass Shower Door if: Budget is less of a primary constraint. You desire a modern, luxurious, and spa-like bathroom experience. Superior water containment is a non-negotiable priority. You are prepared to hire and work with a qualified professional. Conclusion: Transforming Your Tub into a Functional Shower Adding shower functionality to your beautiful clawfoot or freestanding tub is not only possible but can be a transformative upgrade for your bathroom's practicality. The journey comes down to a fundamental choice between the timeless, cost-effective elegance of a curved rod and shower curtain and the sleek, high-performance luxury of a custom glass enclosure. By carefully weighing the pros, cons, costs, and challenges outlined in this guide, you can move forward with confidence. Whether your priority is preserving a vintage charm or achieving a modern spa-like oasis, the right solution exists. Ready to Take the Next Step? If the stunning, splash-free appeal of a custom glass enclosure is the right choice for your home, navigating the specifics can be the final hurdle. For those seeking expert guidance and premium solutions, Sunny Shower is here to help. Visit the Sunny Shower Doors today to explore our wide range of custom shower door solutions designed to complement any bathroom style. Our team of professional consultants is on standby to provide personalized advice, answer your specific questions about freestanding tub installations, and help you bring your vision to life with confidence. Don't just dream about your perfect bathroom—make it a reality. Explore your options at Sunny Shower US now!
Walk-In Tub Shower Doors: A Complete Guide to Types, Pros, Cons & What to Look For
A walk-in tub starts with a low-threshold entry. That is the core access feature. But the door makes the system viable. It must hold back water under pressure and stay easy to use daily. The seal is the final gate that keeps the bathroom dry and the bather secure. Inward-swing doors compress against a gasket. Sliding doors rely on tracks, guides, and gaskets for a tight fit. This article clarifies door types, pros and cons, safety features, seal designs, and how to choose for the space and the user. Why Your Walk-In Tub Door Choice Matters The shower door is the primary barrier against leaks. Seal design and fit determine whether water stays in the tub or creeps out onto floors. Safety depends on the handle, latch, and swing. Stable, low-effort operation is essential for users with limited strength or balance. Door form also shapes the bathing experience. Inward-swing leaves take space inside the tub. Sliding panels clear the entry but add track care. The right choice reduces strain and boosts confidence at every use. Types of Walk-In Tub Shower Doors: Inward Swing vs. Sliding Both types can be built to seal well. They do it in different ways, and that changes how they feel, clean, and last. Inward Swing Shower Doors An inward-swing door opens into the tub space. When closed, it compresses a gasket against a rigid frame. As the tub fills, water pressure helps push the door tighter into its seal. That is a key advantage of inward designs. Most use a simple latch or lever handle. The motion pulls the door into the seal and keeps it there under load. Brands often pair this with a wider aperture for easier entry. Sliding Shower Doors A sliding door moves on a horizontal track. It stacks or overlaps with a fixed panel or nests into a pocket section. The system depends on rollers, guides, and aligned panels. Gaskets or sweeps bridge the gaps and help block splashes. Clean tracks and intact seals are crucial. If debris or wear appears, leaks and sticky motion rise. When set up well, sliding designs save space and look sleek. Walk-In Tub Shower Door Pros and Cons: A Comparative Analysis The trade-offs center on sealing strength, space, ease, and upkeep. Pick based on layout, mobility, and tolerance for maintenance. Pros and Cons of Inward Swing Doors Pros: · Strong sealing. Water pressure aids gasket compression for a robust, watertight closure. · Simpler mechanism. Fewer exposed parts and no external track reduce catch points for grime. · Cleaner edges. Without a track lip at the threshold, cleaning can be simpler around the door opening. Cons: · Uses tub space when open. The leaf swings inward and can make the inside feel tighter. · Maneuvering can be tricky. Transfers and seat positioning may need practice to avoid bumping the leaf. · Clearance planning is vital. Fixtures and walls must allow a full swing and safe approach. Pros and Cons of Sliding Doors Pros: · Saves space. No swing into the tub or bathroom. The opening stays clear for transfer. · Easy access. The threshold can be low and the panel stack leaves room for feet and aids. · Modern look. Clean lines suit shower-tub combos and compact rooms. Cons: · Track cleaning is ongoing. Soap scum and mildew collect and need regular attention. · More leak points. Worn sweeps, misaligned panels, or caulk gaps increase drip risk over time. · More complex parts. Rollers and guides may need adjustment or replacement. Essential Safety Features for Walk-In Tub Shower Doors Safety starts with access and ends with reliable closure. Look for features that speed help, improve grip, and resist impact. · Quick-release or exterior access: Allows helpers to open the door from outside in an emergency, complementing fast drains and grab bars. · Textured, ergonomic handles: Reduce slip and help users with arthritis or weak grip operate the latch. · Secure yet easy latches: Low torque to lock, strong hold under pressure to keep the seal stable while filled. · Shatter-resistant panels: Tempered glass or durable acrylic composites improve impact safety and durability. Tempered safety glass is common. It is stronger than regular glass and crumbles into dull beads if it breaks. That reduces injury risk near wet floors and hard surfaces. Acrylic panels are lighter and budget-friendly but scratch more easily. Tempered glass stays clearer and resists scratches and wear. How Walk-In Tub Shower Door Seals Prevent Leaks A good door uses layered defense. Start with a compression gasket. Add sweeps or lips at edges. Keep the frame square and the caulk intact. · Compression gaskets: In inward-swing doors, these seal as the latch pulls the panel into the frame. Water pressure adds force once filled. · Magnetic seals: Magnets help align and hold the closure, improving contact along the edge while keeping operation light. · Track gaskets and sweeps: In sliding doors, silicone or rubber edges block splash and channel runoff inside the enclosure. · Clean and inspect: Debris, hard water, and soap film can break the seal line. Wipe gaskets and tracks to maintain flexibility and contact. Magnetic seals are popular because they close with a light touch and form a reliable, uniform line of contact. They are used on hinged and sliding systems and are easy to replace when worn. Some walk-in tubs also use magnetic edges to reduce leak paths at latches and vertical joints. Regardless of type, proper installation is critical. Doors need plumb frames, level sills, and well-tooled caulk beads to resist capillary leaks. Compatibility Guide: Choosing a Shower Door for Your Bathroom Layout Plan the door around the room. Measure twice. Think about movement, plumbing, and service access later. · Layout and swing: If picking an inward door, confirm that it opens fully without striking toilets, vanities, or walls. Confirm safe foot placement during entry. · Model-specific fit: Walk-in tub doors are not universal. The hinge points, latch geometry, and seal channels are model-specific. · Plumbing position: Check faucet stacks, diverters, and showerheads. Avoid conflicts with the door path and handle reach. · Professional installation: Level and plumb matter. A crooked tub or frame can cause leaks, sticky latches, and premature seal wear. Leveling is a must. A tub must be supported and true, so water drains to the intended outlet. Shims or mortar set beds help achieve a stable, level base that protects seals and doors. After setting, caulk joints need even, continuous beads. Breaks or voids will wick water. Returns and warranties often require certified installers. That protects both safety and coverage. Walk-In Tub Shower Door Buyer’s Checklist · Measure the space. Decide if a swing leaf fits or if a sliding panel is better for the room. · Choose the trade-off. Pick maximum seal confidence with inward swing or maximum open clearance with sliding. · Verify safety features. Look for quick-release or exterior access, textured handles, and easy but secure latches. · Confirm materials. Tempered glass or robust acrylic panels should meet safety needs and maintenance preferences. · Inspect seals. Ask about compression, magnetic edges, gaskets, and expected service intervals or replacements. · Check warranty terms. Focus on door, frame, hardware, and seal coverage, plus maintenance requirements. · Read performance reviews. Filter for leak control, latch feel, track cleaning, and long-term alignment. · Confirm model compatibility. Match the door to the exact tub model and drain orientation. · Plan pro installation. Require level, plumb, and properly caulked assemblies with documented commissioning. Practical Maintenance Tips for Walk-in Tub Shower Doors A clean door seals better. Maintenance also preserves warranties and keeps operation smooth. · Wipe gaskets weekly. Use mild soap and a soft cloth to remove film that can break seal contact. · Clean tracks often. Lift debris from channels and weep holes to prevent pooling and mildew. · Inspect sweeps and magnets. Replace worn edges, cracked PVC, or weakened magnet pairs promptly. · Check alignment. If sliding action scrapes or binds, adjust rollers and guides to restore even contact. · Re-caulk when needed. If caulk splits or peels, cut out and apply a continuous bead after surfaces are dry. Tempered glass benefits from gentle, non-abrasive cleaners. That protects clarity and reduces micro-scratches that hold grime. Acrylic needs even softer care to avoid marking the surface. Installation Notes That Prevent Leaks Good hardware cannot overcome bad setup. A few steps protect the seal for years. · Level the tub. Use shims or mortar beds as needed. Verify with a long level on multiple axes. · Square the frame. Plumb uprights and true horizontals preserve uniform gasket contact. · Torque hardware evenly. Over-tightening can warp frames; under-tightening causes play. · Tool the caulk bead. Ensure continuous, smooth coverage at all edges and penetrations. · Test under use. Fill the tub, run the shower, and check seals, corners, and tracks for weeping or drips. A final check of latch effort matters. It should lock with light hand force but hold tight under water pressure. If not, adjust to spec and retest. When to Prefer Each Door Type Context narrows the decision. A few cases help clarify the pick. · Small bathrooms: Sliding doors avoid swing conflicts and keep walk paths clear. · Maximum watertight priority: Inward swing doors gain seal strength from water pressure. · Minimal maintenance: Inward designs have no track to scrub, reducing daily cleaning. · Mobility aids and transfers: Sliding panels can provide a larger, unobstructed opening. · Modern shower-tub combos: Sliding glass aligns with a sleek, frameless look. Whichever type is chosen, commit to proper installation and care. That is what preserves performance over time. Conclusion: Making an Informed Decision for Safety and Comfort The door is central to the system. It controls water, supports safe entry, and shapes daily ease of use. The core trade-off is clear. Choose inward swing for stronger, pressure-aided sealing. Choose sliding for space efficiency and a clear opening. Use the checklist. Confirm space, safety features, seals, compatibility, warranty terms, and professional installation to match the door to the bathroom and the user’s needs. For more bathtub shower door options and professional guidance, visit Sunny Shower Online Shop to compare solutions with a consultant and build a system that supports independence and safety for years to come.
How to Clean Shower Door Hard Water Stains
Hard water stains are mineral deposits. They form when water evaporates and leaves behind calcium and magnesium salts that calcify into limescale on glass. The result is a cloudy shower door that resists typical bathroom cleaners and keeps spotting even after scrubbing. This guide explains fast DIY methods, commercial treatments, and prevention tactics so the glass looks new and stays that way. Keywords used naturally: clean shower door hard water stains, hard water buildup, cloudy shower door. Understanding Your Enemy – What Are Hard Water Stains? Before we dive into the solutions, it’s crucial to understand what we’re dealing with. Knowing your enemy is the first step to defeating it. What Causes Hard Water Stains on Shower Doors? Hard water carries dissolved minerals. When droplets sit on glass and evaporate, dissolved ions turn into solid deposits that adhere to the surface. The main culprit is limescale, which is mostly calcium carbonate along with other mineral deposits that create rough, white crusts and opaque patches. This buildup progresses from faint water spots to a cloudy film and, if neglected, to stiff, etched-in deposits that take more effort and stronger chemistry to remove. Are Hard Water Stains or Soap Scum Clouding Your Glass? Mineral deposits look hard, crusty, and white. Soap scum is sticky, filmy, and often hazy, binding with body oils and residue on the glass. Most shower doors have both, which is why methods that dissolve minerals and cut through soap residue work best together. Keywords: mineral deposits, limescale, calcium carbonate, soap scum, cloudy shower glass. Essential Tools and Safety Precautions Gathering the right tools before you start will make the job smoother and more effective. What You’ll Need to Clean Hard Water Stains Safely · Microfiber cloths for lint-free wiping and buffing. · Non-scratch scrub sponges or a Dobie-style pad for safe scrubbing on glass. · Spray bottles for vinegar solutions and commercial cleaners. · Razor blade scraper for flat glass, used correctly at a shallow angle. · Plastic putty knife for scraping without risking edge chips on hardware or seals. · A small bucket for mixing solutions and rinsing tools. Safety matters. Work with ventilation, gloves, and eye protection, especially with acidic products like CLR or strong shower formulations. Always test in a hidden corner first to confirm compatibility with your glass and any protective coatings before full application. Tried & Tested DIY Cleaning Methods for Hard Water Stains For those who prefer natural, affordable, and effective solutions, these DIY methods are highly successful at tackling hard water deposit removal. The Ultimate Vinegar Solution for Hard Water Stains Acid dissolves alkali minerals. White vinegar is a mild acid that softens limescale and helps release soap scum along with dish soap if needed. How to Use Vinegar to Clean Shower Door Stains (Spray Method) · Warm white vinegar in the microwave to boost dissolving power, then pour into a spray bottle. · Spray glass generously, covering edges and handles where buildup hides, and let sit 30–60 minutes for heavy deposits. · Scrub with a non-abrasive pad, then rinse thoroughly with warm water to lift dissolved minerals and residue. · For mixed residue, use a 1:1 vinegar and dish soap spray, let sit, wipe to lather, then rinse clean and squeegee dry. This approach is gentle but effective. It is a strong first step for most cloudy shower doors before trying stronger products. The Powerful Vinegar and Baking Soda Paste Method A paste adds controlled abrasion plus acid action. The fizz helps lift soil from micro-texture on the glass. · Mix baking soda with a small amount of vinegar or water to form a spreadable paste. · Apply to stained areas and let sit 15–20 minutes so the acid can work under the paste. · Scrub with a soft sponge using light pressure, then rinse well to flush residue and loosened scale. The paste is helpful when spray vinegar alone does not clear stubborn rings and cloudy bands near the splash zone. The Overnight Vinegar Soak for Stubborn Stains Contact time matters. Soaking keeps the surface wet with acid and helps dissolve thick mineral deposits. · Soak paper towels or cloth strips in vinegar and apply them to the glass, pressing for full coverage of stubborn patches. · Leave in place overnight for severe hard water buildup that resists standard dwell times. · Remove the pads, scrub lightly with a non-scratch sponge, and rinse thoroughly before drying. Use this for etched-looking haze and white crusts that persist in corners and along door edges. Using CLR (Calcium, Lime, and Rust Remover) Effectively CLR is a commercial acid blend formulated to dissolve calcium, limescale, and rust faster than household vinegar. Use in a well-ventilated area, dilute 1:1 with warm water, test an inconspicuous spot, and limit contact to 2 minutes before rinsing thoroughly with cold water. Do not mix with other cleaners and avoid use on sensitive coated glass or certain metals and stones noted by the manufacturer. CLR is powerful for thick mineral deposits but requires careful handling and quick rinsing to protect surfaces. Alternative Natural Solutions for Hard Water Stains While vinegar is the reigning champion of DIY cleaning, it’s not the only natural player on the field. If you’re out of vinegar, prefer a different scent, or are dealing with a particularly tricky type of buildup, these alternative natural solutions for hard water stains are equally worthy of a spot in your cleaning arsenal. These methods leverage the power of other common household items to dissolve mineral deposits and restore shine without harsh chemicals. Cleaning Shower Doors with Lemon Juice Lemon juice contains citric acid, which works similarly to vinegar and adds a pleasant scent. Halve a lemon, dip the cut side in borax or fine salt for safe abrasion, scrub the door with gentle pressure, and let sit for 10 minutes before rinsing. This method is effective for lighter mineral haze and soap film near daily splash zones. The Bar Keeper’s Friend Soft Cleanser Method Bar Keeper’s Friend uses oxalic acid in some formats; the Soft Cleanser version offers a non-abrasive option suited to glass. Apply a small amount to a damp cloth or sponge, rub in circular motions on hazy areas, and rinse completely to avoid streaking as it dries. This is a solid middle-ground step when vinegar underperforms but a strong acid like CLR is not yet necessary. How to Remove Stubborn Hard Water Stains with a Razor Scraper A sharp razor scraper can shear off mineral scale. It must be used gently to avoid scratching the glass or catching hardware. · Keep the glass wet with water or vinegar during scraping to lubricate the blade. · Hold the blade at a shallow angle and apply steady, even pressure, moving in long strokes on flat glass only. · Avoid edges, seals, and labels; switch to a plastic putty knife in tight areas to reduce risk. Follow with a vinegar rinse and a microfiber buff to remove streaks and fine residue after scraping. Drying and Buffing for a Perfect, Streak-Free Shine After any method, rinse thoroughly, then squeegee from top to bottom to remove water. Finish with a dry, clean microfiber cloth to buff remaining moisture and produce a clear, streak-free finish. Drying also prevents immediate new spots as minerals would otherwise redeposit during evaporation. How to Prevent Hard Water Stains on Shower Doors The best way to clean shower door hard water stains is to never let them form in the first place. A simple, consistent routine is your best defense. How to Prevent Hard Water Buildup on Shower Doors Prevention is faster than deep cleaning. Small daily and weekly habits, plus protective coatings, keep glass clear far longer. The Daily Squeegee Habit A daily squeegee is the single most effective step. Removing water immediately prevents minerals from drying on the glass at all. One minute after each shower saves hours of scrubbing later and keeps hard water buildup minimal. Using a Water Repellent Treatment Apply a water repellent made for shower glass to help water bead and roll off instead of clinging and drying into spots. Rain-X Shower Door Water Repellent can prevent new hard water stains and soap scum for weeks per label, and some users report protection lasting months with good care and ventilation. Reapply as directed to maintain the hydrophobic barrier and keep the cloudy shower door look at bay. Improving Ventilation Run the bathroom fan during and after showers to reduce humidity and speed drying, or open a window if available. Better airflow removes moisture quickly so water does not sit and evaporate on the glass with minerals intact. Weekly Wipe-Down Routine Once a week, wipe the door with a vinegar-and-water mix to neutralize early deposits and soap residues before they harden. Follow with a microfiber buff and the squeegee to finish dry and streak-free. Consider a Water Softener A whole-house water softener reduces calcium and magnesium at the source, cutting the rate of mineral deposits across all fixtures. Softening helps the entire bathroom stay cleaner and reduces how often strong acid cleaners are needed for the shower. Step-by-Step Cleaning Plans Use these targeted workflows to clean shower door hard water stains efficiently and safely based on severity. · Light haze and water spots: Spray warm vinegar, dwell 20–30 minutes, scrub lightly, rinse, squeegee, microfiber buff, then apply water repellent when dry. · Moderate cloudiness with soap scum: Use a 1:1 vinegar and dish soap spray, dwell 10–15 minutes, wipe to lather, rinse, then treat stubborn patches with a baking soda paste before final rinse and dry. · Heavy limescale bands: Apply an overnight vinegar soak on towels for thick patches, scrape carefully with a wetted razor on flat glass as needed, then rinse and finish with Bar Keeper’s Friend Soft Cleanser for polishing. · Severe mineral crusts: Use diluted CLR per label for up to 2 minutes on compatible surfaces, rinse thoroughly, then follow with vinegar to neutralize residue and apply water repellent after drying. These sequences escalate carefully. Start mild and move to stronger steps only where needed to protect coatings and reduce risk. Troubleshooting Common Issues If vinegar alone does not clear deposits, extend dwell time or switch to a paste and gentle abrasion before stepping up to commercial acids. If streaks persist after rinsing, squeegee first, then buff dry with a clean microfiber to eliminate film and water lines. If deposits seem etched, use a soak and scraping combo, then consider professional polishing if permanent etching is suspected. Always check that any cleaner is compatible with coated glass, when in doubt, test first and default to milder methods. Safety Notes and Surface Compatibility Strong acids work fast but require care. Limit contact time, ventilate well, and avoid mixing products to prevent harmful reactions. Many manufacturers warn against using CLR on natural stone, certain metals, and coated glass; follow labels precisely and protect nearby surfaces with towels or plastic sheeting. Razor scrapers should only be used on flat glass and never on acrylic or textured panels to avoid scratching. Maintenance Habits That Keep Glass Clear Set a simple routine. Squeegee after each shower, buff once daily if possible, and wipe weekly with a vinegar-water spray to reset the glass. Reapply water repellent on a set schedule for consistent beading and easy cleanups between deep cleans. Keep tracks, seals, and metal trims wiped to prevent drip-back and mineral streaks from edges onto the door. Conclusion Restoring clarity to a cloudy shower door is achievable with the right plan. Natural DIY methods like warm vinegar sprays, vinegar-and-baking-soda pastes, and lemon-based scrubs dissolve mineral deposits and soap scum without harsh fumes or long scrubbing sessions. For heavy hard water buildup, careful use of CLR or a specialized shower glass cleaner removes stubborn limescale quickly when used as directed and rinsed well. Prevention matters most. For more shower door solutions and guidance from a professional consultant, visit Sunny Shower US Online Shop to explore products that restore and protect shower glass long-term.
